
Hostess Cupcakes have always held a special place in my heart. I remember eagerly grabbing one from my lunchbox as a kid, that iconic swirl promising pure chocolatey bliss. For years, I dreamt of recreating that perfect balance of moist chocolate cake, fluffy creme filling, and decadent ganache. I’ve discovered that making these classic Hostess snack cakes at home is not only possible but incredibly rewarding. The aroma of baking chocolate filling my kitchen instantly transports me back to those nostalgic moments. This homemade Hostess Cupcakes recipe truly captures the magic, tasting even better than the store-bought version. Let’s get cooking!
Why You’ll Love This Homemade Hostess Cupcakes Recipe
Making your own Hostess Cupcakes from scratch is a truly rewarding experience. I promise you’ll adore these for so many reasons, from their incredible flavor to how simple they are to whip up for any occasion.
- They taste even better than the original, with a richness and freshness that store-bought versions simply can’t match.
- This Easy Hostess Cupcakes recipe is surprisingly straightforward, making it perfect for bakers of all skill levels.
- You control the ingredients, allowing you to use high-quality components for a treat you can feel good about.
- Preparing these at home is budget-friendly, often costing less than buying multiple boxes of snack cakes.
- It’s a fantastic family-friendly activity, and kids especially love helping with the iconic white swirl.
- The prep time for these Easy Hostess Cupcakes is manageable, fitting perfectly into a busy schedule.
- You’ll enjoy a nostalgic trip down memory lane with every bite of these classic chocolate treats.
Ingredients for Classic Hostess Cupcakes
Here’s a comprehensive Hostess Cupcakes ingredients list for crafting these delightful treats right in your own kitchen. I’ve carefully selected each component to ensure the perfect balance of flavor and texture, just like the original.
- 1/2 cup melted coconut oil (or butter) – provides richness and moisture to the chocolate cupcake batter.
- 2 large eggs, at room temperature – crucial for binding and giving the cupcakes structure.
- 1/2 cup buttermilk, at room temperature – reacts with the baking soda for a tender crumb.
- 1/2 cup plain Greek yogurt or sour cream – adds extra moisture and a slight tang, enhancing the chocolate flavor.
- 1 cup granulated sugar – for sweetness, balancing the cocoa.
- 1 tablespoon vanilla extract – a must-have flavor enhancer for all chocolate baked goods.
- 1 1/2 cups all-purpose flour – the base for our perfectly structured cupcakes.
- 1 cup unsweetened cocoa powder – gives these cupcakes their deep, iconic chocolate taste.
- 1 1/2 teaspoons baking powder – along with baking soda, ensures a light and airy texture.
- 1 teaspoon baking soda – works with the buttermilk and cocoa for lift.
- 1 teaspoon salt – balances the sweetness and brings out the chocolate notes.
- 1/2 cup hot black coffee – this secret ingredient intensifies the chocolate flavor without making the cupcakes taste like coffee.
- 3 egg whites – the foundation for our fluffy marshmallow creme filling.
- 3/4 cup granulated sugar – for sweetness and stability in the filling.
- 1/2 teaspoon cream of tartar – helps to stabilize the egg whites, creating that perfect marshmallow texture.
- 1 teaspoon pure vanilla extract – flavors the delicious creme filling.
- 1 cup semi-sweet chocolate chips – for the glossy, rich chocolate ganache topping.
- 1/3 cup milk – thins the chocolate chips into a pourable glaze.
- 1 cup white chocolate chips, melted – essential for piping the iconic swirl on top of each cupcake.
How to Make Hostess Cupcakes From Scratch
Making these iconic treats might seem daunting, but I promise, it’s a fun and straightforward process. Follow these steps carefully, and you’ll soon be enjoying your own delicious homemade Hostess Cupcakes.
- Step 1: First, preheat your oven to 350°F (175°C). Then, line a standard 12-cup cupcake pan with paper liners. I always find preparing my baking tools first makes everything run so much smoother.
- Step 2: In a large mixing bowl, whisk together the melted coconut oil, large eggs, buttermilk, Greek yogurt (or sour cream), granulated sugar, and vanilla extract until the mixture is beautifully smooth and well combined. This forms the wet base for our rich chocolate batter.
- Step 3: Next, add the all-purpose flour, unsweetened cocoa powder, baking powder, baking soda, and salt to the wet ingredients. Mix until they are just combined. Be careful not to overmix, as this can lead to tough cupcakes; a few lumps are perfectly fine.
- Step 4: Slowly pour in the hot black coffee, stirring gently until the cupcake batter is smooth and takes on a glossy, dark chocolate sheen. The coffee really deepens the chocolate flavor, making these chocolate creme filled cupcakes truly irresistible.
- Step 5: Divide the luscious batter evenly among the prepared cupcake liners, filling each about two-thirds full. This ensures they bake up perfectly without overflowing.
- Step 6: Bake the cupcakes for 25–30 minutes, or until the tops spring back when lightly touched. A toothpick inserted into the center should come out clean. Once baked, let your chocolate Hostess Cupcakes cool completely on a wire rack before moving on to the next steps.
- Step 7: To create the marshmallow fluff filling for your chocolate creme filled cupcakes: In a heatproof bowl, combine the egg whites, granulated sugar, and cream of tartar. Place this bowl over a pot of simmering water (ensure the bowl doesn’t touch the water) and whisk constantly for about 5 minutes. The mixture should become opaque and the sugar should fully dissolve.
- Step 8: Remove the bowl from the heat, add the pure vanilla extract, and beat with an electric mixer on high speed for about 5 minutes. You’re looking for a glossy, stiff marshmallow fluff that holds its peaks beautifully.
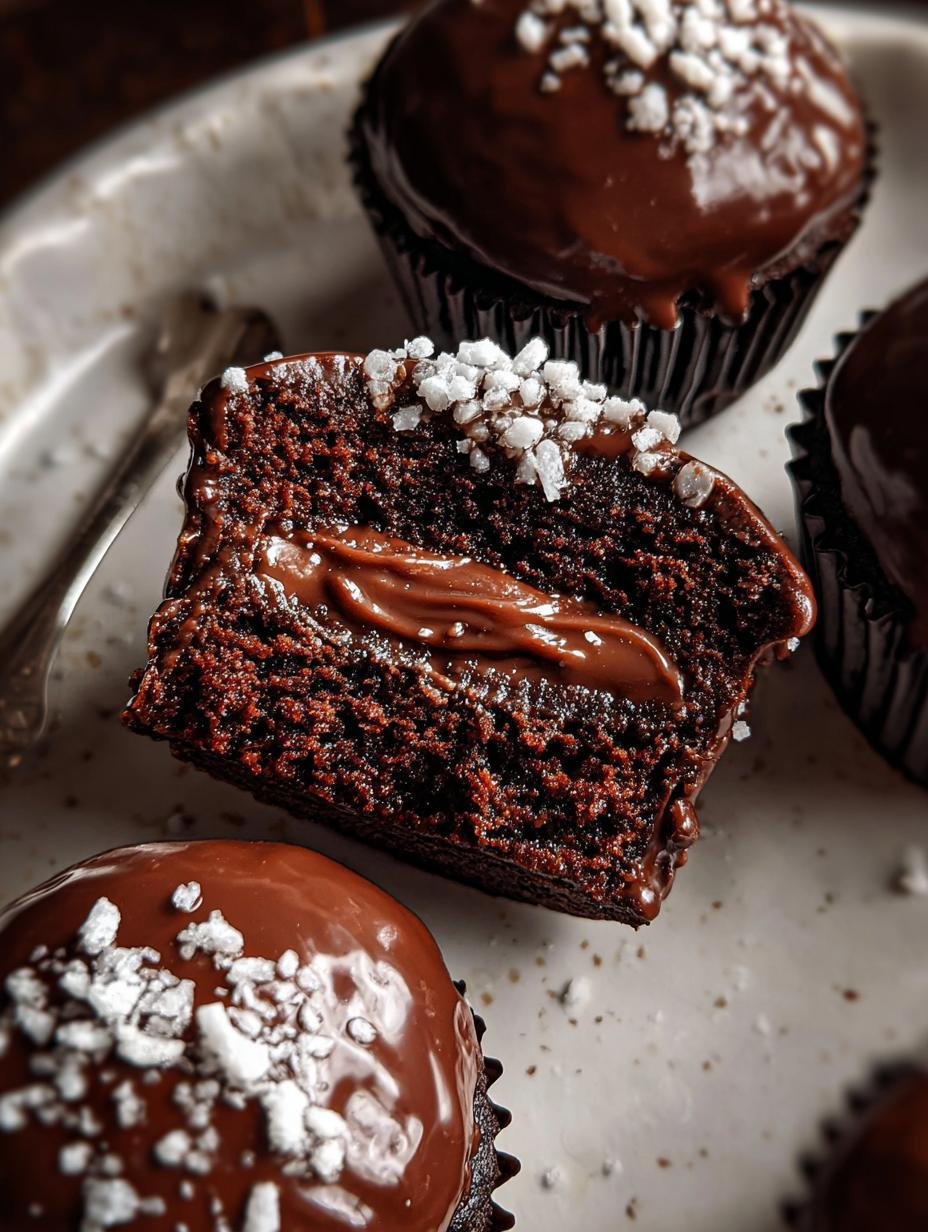
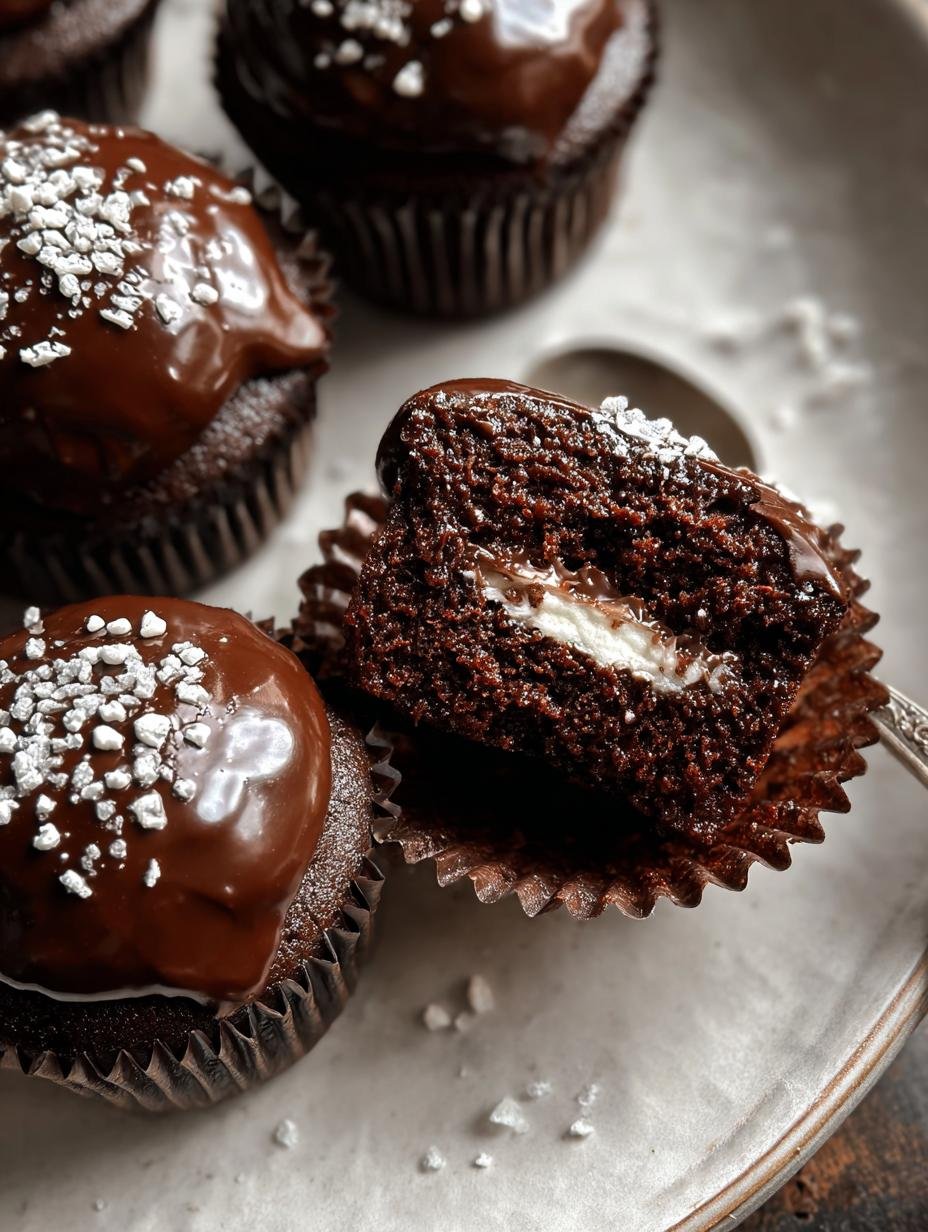
- Step 9: Once the cupcakes are cool, use a small paring knife to carefully cut a small cone out of the center of each cupcake. Gently fill this cavity with the homemade marshmallow fluff – this is where the magic happens!
- Step 10: For the glossy chocolate glaze: Melt the semi-sweet chocolate chips with the milk over very low heat, stirring constantly until the mixture is smooth and luxurious.
- Step 11: Dip the top of each filled cupcake into the warm glaze, allowing any excess to drip off. Let the glaze set slightly; I usually place them back on the wire rack.
- Step 12: Finally, spoon the melted white chocolate into a piping bag (or a small plastic bag with the tip snipped off). Pipe the signature loops or swirl across each cupcake top, giving your chocolate creme filled cupcakes that classic Hostess look. Let them set completely before serving.
Pro Tips for the Best Hostess Cupcakes
I’ve learned a few tricks over the years that truly elevate these homemade treats. These pro tips will ensure your Hostess Cupcakes turn out perfectly every single time, from the moist cake to the iconic swirl.
- Always use room temperature ingredients for your cupcake batter. This helps them combine more smoothly and bakes into a more uniform, tender crumb.
- Don’t overmix the batter! Mix only until just combined to prevent dense, tough cupcakes. A light hand is key for fluffy results.
- For the marshmallow filling, ensure your bowl and whisk are completely grease-free. Any fat can prevent the egg whites from whipping up properly.
- Let the cupcakes cool completely before filling and glazing. Attempting to do so while warm will result in a messy, melted disaster.
- Use a good quality cocoa powder for the deepest, most authentic chocolate flavor in your Hostess Cupcakes.
What’s the secret to perfect Cream-filled chocolate cupcakes?
The real secret lies in the marshmallow fluff filling. Using a Swiss meringue method, where you gently heat the egg whites and sugar, creates a stable, glossy, and incredibly smooth filling. This technique gives you that authentic, creamy texture and delightful Original Hostess Cupcakes flavor.
Can I make DIY Hostess Cupcakes ahead of time?
Absolutely! You can bake the chocolate cupcakes a day in advance and store them in an airtight container at room temperature. Prepare the marshmallow fluff and glaze on the day you plan to serve. This makes assembling your DIY Hostess Cupcakes much easier and less rushed.
How do I avoid common mistakes with Retro Hostess Cupcakes?
To avoid pitfalls, first, don’t overfill your cupcake liners; two-thirds full is perfect. Second, make sure your white chocolate for the swirl isn’t too hot, or it will melt into the glaze. Lastly, always allow the chocolate glaze to set slightly before attempting the iconic white swirl on your Retro Hostess Cupcakes.
Best Ways to Serve Hostess-style chocolate cupcakes
These homemade Hostess-style chocolate cupcakes are a perfectly nostalgic treat on their own, but I love elevating the experience with a few serving suggestions. They’re fantastic for birthday parties, potlucks, or simply as an after-dinner dessert to satisfy a sweet craving.
For a truly decadent experience, serve them alongside a scoop of vanilla bean ice cream or a dollop of fresh whipped cream. The cool, creamy textures beautifully complement the rich chocolate and marshmallow filling. You can also pair these delicious Hostess snack cakes with a tall glass of cold milk, just like we did as kids. They’re guaranteed to bring smiles to everyone’s faces!
Nutrition Facts for Hostess Cupcakes
I know many of you are curious about the nutritional breakdown of these delightful treats. Here’s an estimate for one homemade Hostess Cupcakes serving, based on the ingredients in this recipe:
- Serving Size: 1 cupcake
- Calories: 320
- Sugar: 29g
- Sodium: 240mg
- Fat: 14g
- Saturated Fat: 8g
- Unsaturated Fat: 5g
- Trans Fat: 0g
- Carbohydrates: 45g
- Fiber: 3g
- Protein: 5g
- Cholesterol: 50mg
Please remember that these nutritional values are estimates and may vary based on specific brands and quantities of ingredients you use for your Hostess Cupcakes.
How to Store and Reheat Hostess Cupcakes
Once you’ve made these delicious Hostess Cupcakes, proper storage is key to keeping them fresh and perfectly moist. I always make sure they are completely cooled before putting them away. This prevents condensation from forming inside the container, which can make the glaze sticky.
For short-term storage, place your Hostess snack cakes in an airtight container at room temperature for up to 2 days. If you need them to last longer, transfer them to the refrigerator where they’ll stay fresh for 3-4 days. For extended enjoyment, these cupcakes freeze beautifully! Wrap individual cupcakes tightly in plastic wrap, then place them in a freezer-safe bag or container for up to 3 months.
To reheat, simply let them thaw at room temperature for an hour or two. I find they taste best when slightly chilled or at room temperature, so I don’t usually reheat them in the microwave. This ensures the chocolate glaze and marshmallow filling retain their ideal texture.
Frequently Asked Questions About Hostess Cupcakes
Can I freeze homemade Hostess Cupcakes?
Yes, you absolutely can! I often make a big batch of these Hostess Cupcakes and freeze some for later. Once they’re completely cooled and the glaze has set, wrap each cupcake individually in plastic wrap, then place them in an airtight freezer-safe container or bag. They’ll stay fresh for up to 2-3 months. Just thaw them at room temperature for a few hours before serving.
What’s the best way to get the iconic white swirl on Hostess Cupcakes?
Achieving that classic white swirl is easier than you think! After your chocolate glaze has set (but isn’t rock-hard), melt your white chocolate chips. Transfer the melted white chocolate to a piping bag with a tiny snip at the end, or even a small Ziploc bag with a corner cut off. Then, pipe three parallel lines across the top of each Hostess Cupcakes, and use a toothpick to gently drag it perpendicularly through the lines, creating the signature loops. Practice makes perfect!
Why are Hostess Cupcakes so popular, and why should I make them at home?
Hostess Cupcakes are so popular because they tap into a deep sense of nostalgia for many people. Their unique combination of moist chocolate cake, creamy filling, and glossy chocolate glaze with that iconic swirl is instantly recognizable and comforting. Making them at home, as I’ve discovered, allows you to enjoy that same beloved flavor with fresher ingredients, no preservatives, and a customizable touch. Plus, the satisfaction of creating these classic Hostess snack cakes from scratch is truly unmatched!
Can I substitute the marshmallow fluff filling with something else?
While the homemade marshmallow fluff really gives these Hostess Cupcakes their authentic taste and texture, you can certainly experiment! Some people opt for a simple vanilla buttercream, a store-bought marshmallow cream (though it won’t have the same light, airy quality), or even a whipped ganache. Just be sure whatever filling you choose complements the rich chocolate flavor of the cupcake.
Variations of Chocolate Hostess Cupcakes You Can Try
Once you’ve mastered this classic Copycat Hostess Cupcakes recipe, you might be eager to experiment with different twists! I love how versatile these treats are, allowing for endless creativity while still holding onto that nostalgic charm. Here are a few variations of Chocolate Hostess Cupcakes you can easily try:
- Peppermint Holiday Cupcakes: For a festive touch, add 1/2 teaspoon of peppermint extract to the marshmallow fluff filling. You can also sprinkle crushed candy canes on top of the chocolate glaze for extra crunch and seasonal flair.
- Gluten-Free Version: Simply swap the all-purpose flour for a good quality gluten-free all-purpose flour blend (one that contains xanthan gum). Ensure all other ingredients are naturally gluten-free to create a delicious gluten-free Copycat Hostess Cupcakes recipe.
- Spice Them Up: Introduce a hint of warmth by adding 1/2 teaspoon of cinnamon or a pinch of cayenne pepper to the chocolate cupcake batter. This unexpected kick beautifully complements the rich cocoa flavor.
- Salted Caramel Delight: Drizzle a little homemade or store-bought salted caramel sauce over the chocolate glaze before it sets, or even swirl some into the marshmallow filling. This adds a sophisticated, sweet-and-salty dimension to your Chocolate Hostess Cupcakes.

Amazing Hostess Cupcakes: 1 Secret to Pure Bliss
- Total Time: 1 hour 30 minutes
- Yield: 18 cupcakes 1x
- Diet: Vegetarian
Description
Homemade Hostess Cupcakes capture the rich chocolatey flavor and marshmallow fluff filling of the classic snack cake, made from scratch with simple ingredients. These chocolate creme filled cupcakes feature a glossy chocolate glaze and the iconic white swirl, offering a nostalgic, bakery-quality treat without preservatives.
Ingredients
- 1/2 cup melted coconut oil (or butter)
- 2 large eggs, at room temperature
- 1/2 cup buttermilk, at room temperature
- 1/2 cup plain Greek yogurt or sour cream
- 1 cup granulated sugar
- 1 tablespoon vanilla extract
- 1 1/2 cups all-purpose flour
- 1 cup unsweetened cocoa powder
- 1 1/2 teaspoons baking powder
- 1 teaspoon baking soda
- 1 teaspoon salt
- 1/2 cup hot black coffee
- 3 egg whites
- 3/4 cup granulated sugar
- 1/2 teaspoon cream of tartar
- 1 teaspoon pure vanilla extract
- 1 cup semi-sweet chocolate chips
- 1/3 cup milk
- 1 cup white chocolate chips, melted (for swirl)
Instructions
- Preheat your oven to 350°F (175°C) and line a cupcake pan with paper liners.
- In a large mixing bowl, whisk together the melted coconut oil, eggs, buttermilk, Greek yogurt (or sour cream), granulated sugar, and vanilla extract until smooth.
- Add the all-purpose flour, unsweetened cocoa powder, baking powder, baking soda, and salt to the wet ingredients. Mix until just combined.
- Slowly pour in the hot black coffee, stirring until the cupcake batter is smooth and glossy.
- Divide the batter evenly among the cupcake liners, filling each about two-thirds full.
- Bake for 25–30 minutes, or until the tops are set. Let the chocolate Hostess cupcakes cool completely on a rack.
- To make the marshmallow fluff for your cream-filled chocolate cupcakes: In a heatproof bowl, combine the egg whites, granulated sugar, and cream of tartar. Place the bowl over a pot of simmering water and whisk constantly for about 5 minutes until the sugar dissolves and the mixture turns opaque.
- Remove the bowl from the heat, add the pure vanilla extract, and beat with an electric mixer on high speed for about 5 minutes until glossy, stiff peaks form for the marshmallow filling.
- Once the homemade Hostess cupcakes are cool, use a paring knife to cut a small cone out of the center of each cupcake and fill the hole with the marshmallow fluff.
- For the chocolate glaze: Melt the semi-sweet chocolate chips with the milk over low heat, stirring until smooth.
- Dip the top of each cupcake into the glaze and let any excess drip off. Allow the glaze to set.
- Spoon the melted white chocolate into a piping bag (or a small plastic bag with the tip snipped off) and pipe the signature loops or swirl across each cupcake top. Let set before serving your retro Hostess cupcakes.
Notes
- Add 1 teaspoon of espresso powder to the cupcake batter for a deeper chocolate flavor.
- For a peppermint variation, add peppermint extract to the marshmallow fluff and top with crushed candy canes during the holidays.
- Store the Hostess snack cakes at room temperature in an airtight container for up to 2 days, or refrigerate for up to 5 days.
- Unfrosted cupcakes can be frozen for up to 2 months; glaze and decorate after thawing for a fresh taste.
- To simplify, you can substitute homemade marshmallow fluff with store-bought marshmallow cream for these DIY Hostess Cupcakes.
- Prep Time: 1 hour
- Cook Time: 30 minutes
- Category: Dessert
- Method: Baked
- Cuisine: American
Nutrition
- Serving Size: 1 cupcake
- Calories: 320
- Sugar: 29g
- Sodium: 240mg
- Fat: 14g
- Saturated Fat: 8g
- Unsaturated Fat: 5g
- Trans Fat: 0g
- Carbohydrates: 45g
- Fiber: 3g
- Protein: 5g
- Cholesterol: 50mg


Leave a Reply