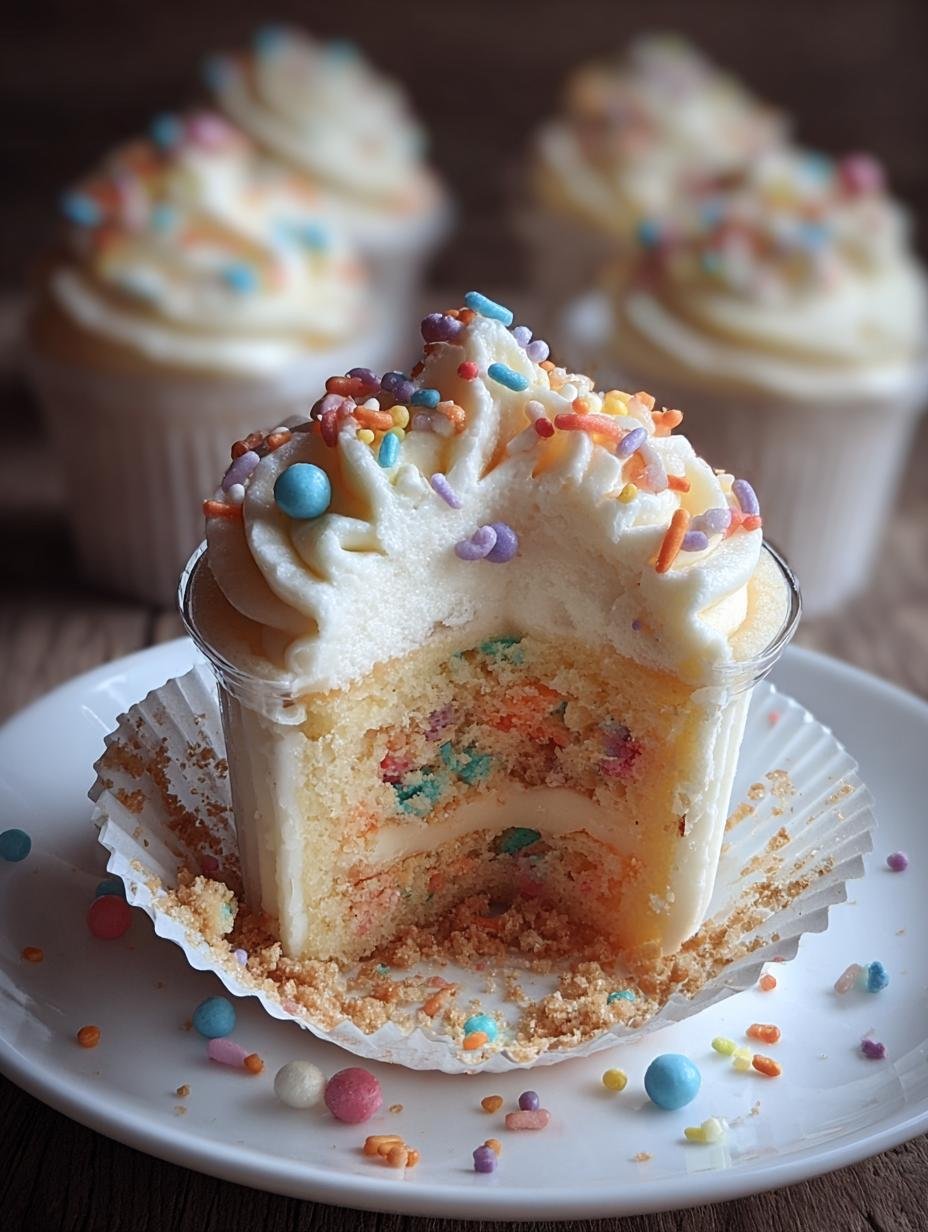
Deliciously easy cake cup has been my go-to when I need a quick, impressive dessert that tastes homemade. I remember the first time I made these, the aroma of vanilla and sweet cake filled my kitchen, and my family couldn’t wait to dig in. These individual delights are so moist and topped with a dreamy buttercream that truly makes them a cake cup recipe everyone will love. They’re perfect for weeknight treats or even for a small gathering where you want something special without a lot of fuss. Let’s get baking!
Why You’ll Love This Cake Cup Recipe
You’ll absolutely adore this cake cup recipe for so many reasons. It’s incredibly versatile and caters to everyone’s taste buds.
- Effortless Preparation: This recipe is designed for ease, making it a perfect choice even for beginner bakers.
- Crowd-Pleasing Flavor: The combination of moist cake and creamy frosting is a guaranteed hit for any gathering.
- Perfect Portions: Individual servings mean no slicing or fuss, making it a simple cake cup for everyone.
- Quick Dessert Solution: When you need a dessert in a hurry, these come together fast.
- Customizable: Easily adapt the cake flavor, frosting, and toppings to suit any occasion or preference.
- Visually Appealing: These little desserts look as good as they taste, adding a festive touch to any table.
- Shareable Delight: It’s a wonderful way to share a sweet treat, making it a simple cake cup for everyone to enjoy.
Ingredients for the Best Cake Cup Recipe
Here’s what you’ll need to create this fantastic easy cake cup dessert:
- 1 box white cake mix (15.25 oz) – the base for our fluffy cake
- 1 cup water – to moisten the cake batter
- 1/2 cup vegetable oil – keeps the cake tender and moist
- 3 large eggs – bind everything together and add richness
- 1/4 cup rainbow sprinkles (optional) – for a fun pop of color and texture inside the cake
- 1 cup unsalted butter, softened – the creamy foundation for our frosting
- 4 cups powdered sugar – for that classic sweet, smooth buttercream
- 1 tablespoon vanilla extract – essential for that delicious vanilla flavor
- 1–2 tablespoons milk or heavy cream – to get the perfect frosting consistency
- Optional Toppings: Extra rainbow sprinkles, mini candies or cookies, colorful whipped cream – get creative!

How to Make Individual Cake Cups
- Step 1: Preheat your oven to 350°F (175°C). Generously grease a 9×13-inch baking pan. This ensures your cake releases easily, setting you up for a perfect easy cake cup.
- Step 2: In a large bowl, combine the white cake mix, 1 cup of water, 1/2 cup of vegetable oil, and 3 large eggs. Beat with an electric mixer on medium speed for 2 minutes until the batter is smooth and well-combined. The batter should be thick but pourable. If you’re adding sprinkles for extra flair, gently fold them in now.
- Step 3: Pour the cake batter evenly into the prepared baking pan. Bake for 25–30 minutes. You’ll know it’s ready when a toothpick inserted into the center comes out clean. The top should be golden brown and spring back slightly when touched. Let the cake cool completely on a wire rack before moving on to frosting. This cooling step is crucial for the best texture.
- Step 4: While the cake cools, let’s make the frosting. In a separate bowl, beat 1 cup of softened unsalted butter until it’s wonderfully creamy. Gradually add 4 cups of powdered sugar, mixing until it’s well incorporated. Stir in 1 tablespoon of vanilla extract.
- Step 5: Add 1–2 tablespoons of milk or heavy cream to the frosting mixture, one tablespoon at a time, beating until it reaches a smooth, fluffy, and spreadable consistency. You want it thick enough to hold its shape but easy to pipe or spread. This frosting is key to making your easy cake cup dessert truly special.
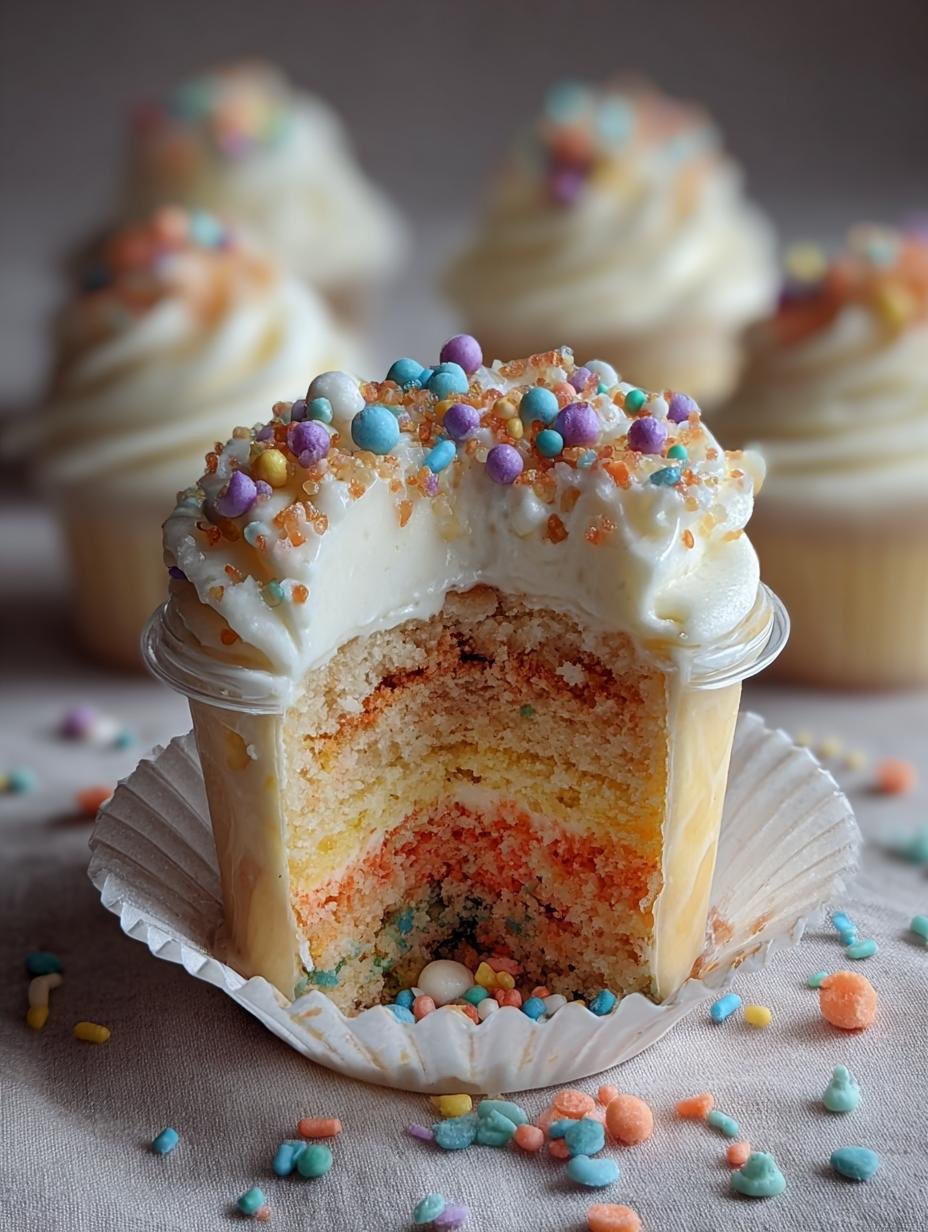
- Step 6: Once the cake is completely cool, cut it into small cubes or use a round cutter to create individual cake portions. Layer the cake pieces and frosting alternately into 4–6 oz cups or jars. Start with a layer of cake, then a dollop of frosting, and repeat.
- Step 7: Finish your individual cake cup creations with a final swirl of frosting on top. Decorate with extra rainbow sprinkles, mini candies, or cookies for a festive touch.
- Step 8: For the best flavor and texture, refrigerate the assembled dessert cups for at least 30 minutes before serving. This allows the frosting to set and the flavors to meld beautifully, creating a truly delightful treat.
Pro Tips for Deliciously Easy Cake Cups
I’ve learned a few tricks that make these cake cups even better:
- For extra moisture in the cake, use milk instead of water when mixing the cake batter.
- Don’t overbake the cake; it should be slightly moist, not dry. This is crucial for a tender crumb.
- Chill your frosting bowl and beaters for about 10 minutes before making the buttercream. This helps it whip up fluffier.
- If you want super clean layers, use a piping bag with a round tip to add the frosting between cake layers.
What’s the secret to a perfect cake cup?
The magic lies in the balance of moist cake and creamy frosting. Using milk in the cake batter and ensuring the cake is completely cool before frosting are key. This simple cake in a cup recipe relies on those details.
Can I make cake cups ahead of time?
Absolutely! You can bake the cake layers and make the frosting up to 2 days in advance. Store them separately in airtight containers in the refrigerator. Assemble the cups just before serving or up to a day ahead.
How do I avoid common mistakes with cake cups?
The biggest pitfall is overbaking the cake, which leads to dryness. Always check for doneness with a toothpick and remove it promptly. Also, ensure the cake is fully cooled before frosting to prevent the buttercream from melting.
Best Ways to Serve Your Dessert Cake Cup
These delightful cake cups are so versatile, you can serve them in so many fun ways! For a special occasion, present them in elegant glasses or small jars. It makes each person feel like they’re getting a special individual treat.
You can also skip the fancy dishes and serve them buffet-style in simple paper or plastic cups, perfect for kids’ parties or a casual get-together. For an extra touch, pair them with a scoop of vanilla bean ice cream or a dollop of fresh whipped cream. They also pair wonderfully with a light fruit salad for a balanced sweet and refreshing dessert experience.
Nutrition Facts for Cake Cups
Here’s a breakdown of the nutritional information for one of these delightful cake cups, based on the recipe’s yield and ingredients:
- Serving Size: 1 dessert cup
- Calories: 320
- Fat: 15g
- Saturated Fat: 8g
- Protein: 2g
- Carbohydrates: 44g
- Fiber: 0g
- Sugar: 32g
- Sodium: 240mg
Nutritional values are estimates and may vary based on specific ingredients used and portion sizes.
How to Store and Reheat Cake Cups
Properly storing your delicious cake cups ensures they stay fresh and tasty for your next craving. Once your beautiful individual cake cups have completely cooled, it’s time to think about storage. For short-term enjoyment, place them in airtight containers. This is key for maintaining their moisture and preventing them from drying out. You can keep these delightful treats in the refrigerator for up to 3–4 days. They are perfect for grabbing a quick treat throughout the week!
If you want to make these even further in advance, you can freeze them. It’s best to freeze the cake and frosting separately if possible, but assembled cups freeze well too. Wrap them tightly in plastic wrap, then in a layer of aluminum foil, or place them in a freezer-safe container. They can be stored in the freezer for up to 3 months. When you’re ready to enjoy them, thaw overnight in the refrigerator. For a quick reheat, you can gently warm them in a microwave for about 10–15 seconds, just enough to take the chill off and soften the frosting slightly.
Frequently Asked Questions About Cake Cups
How do you make cake cups from scratch?
To make cake cups from scratch, you’ll typically start by preparing a cake batter from basic ingredients like flour, sugar, eggs, butter, and leavening agents, or by using a cake mix as a base, which is what this recipe does. You’ll mix your wet and dry ingredients until smooth, then bake the batter in individual cups or a larger pan that you’ll later cut. This how to make cake cups guide focuses on the easy cake mix method for speed and simplicity.
Can I use different frosting flavors for my cake cups?
Absolutely! While this recipe uses a classic vanilla buttercream, feel free to get creative. Chocolate, cream cheese, lemon, or even a fruit-flavored frosting would be delicious. You can also experiment with adding different extracts like almond or strawberry to the vanilla frosting for a unique twist. The possibilities are endless for customizing your dessert cake cup experience.
What are the best kinds of cups to use for individual cake cups?
For individual servings, you can use small glasses, mason jars, or even sturdy paper or plastic dessert cups. The key is to choose containers that are about 4–6 ounces in size. If you’re using a larger baking pan and cutting the cake, you can then layer the cake and frosting in any small serving dish. This recipe offers flexibility in how you present your delicious cake cups.
How long do cake cups typically last?
When stored properly in an airtight container in the refrigerator, these cake cups usually stay fresh for about 3 to 4 days. The frosting helps to seal in the moisture of the cake, keeping it tender. For longer storage, you can freeze them for up to 3 months, but it’s best to thaw them in the refrigerator overnight to maintain their texture.
Variations of This Cake Cup Recipe
This basic cake cup recipe is a fantastic starting point, but I love how easily you can change it up! It’s like having a whole menu of desserts from one simple idea. Whether you’re catering to dietary needs or just craving a different flavor, there are so many fun ways to adapt it.
- Chocolate Lover’s Dream: Swap the white cake mix for a chocolate cake mix. You can also make a chocolate buttercream by adding cocoa powder or melted chocolate to the frosting. It becomes a decadent mug cake recipe everyone will rave about.
- Gluten-Free & Vegan Options: Use a gluten-free white cake mix and dairy-free milk for the frosting. For a vegan version, ensure your cake mix is vegan-friendly and use vegan butter and non-dairy milk for the frosting.
- Baked in Mugs: For a truly individual experience, you can bake the batter directly in oven-safe mugs! This is perfect for a cozy evening treat. Just reduce the baking time to about 20-25 minutes, or until a toothpick comes out clean.
- Fruity Twists: Fold in some lemon zest into the cake batter for a bright flavor, or add a swirl of fruit puree (like strawberry or raspberry) into the frosting for a beautiful color and taste.
Delicious Cake Cup: Everyone’s Favorite Treat
- Total Time: 50 minutes plus chilling time
- Yield: 10–12 dessert cups 1x
- Diet: Vegetarian
Description
Create delicious cake cups that everyone will love with this simple recipe. These individual desserts feature layers of moist cake and creamy vanilla buttercream frosting, perfect for any occasion.
Ingredients
- For the Cake:
- 1 box white cake mix (15.25 oz)
- 1 cup water
- 1/2 cup vegetable oil
- 3 large eggs
- 1/4 cup rainbow sprinkles (optional)
- For the Vanilla Buttercream Frosting:
- 1 cup unsalted butter, softened
- 4 cups powdered sugar
- 1 tablespoon vanilla extract
- 1–2 tablespoons milk or heavy cream
- Optional Toppings:
- Extra rainbow sprinkles
- Mini candies or cookies
- Colorful whipped cream
Instructions
- Prepare the Cake Batter: Preheat oven to 350°F (175°C) and grease a 9×13-inch pan. In a large bowl, combine cake mix, water, oil, and eggs. Beat for 2 minutes until smooth. Fold in sprinkles if using.
- Bake the Cake: Pour batter into the pan and bake 25–30 minutes, or until a toothpick comes out clean. Cool completely on a wire rack.
- Make the Frosting: Beat softened butter until creamy. Gradually add powdered sugar, mixing well after each addition. Add vanilla and milk or cream until smooth and fluffy.
- Assemble the Dessert Cups: Cut the cooled cake into cubes or rounds. Layer cake and frosting alternately in 4–6 oz cups or jars. Finish with a swirl of frosting and decorate with sprinkles or candies.
- Chill Before Serving: Refrigerate for at least 30 minutes to set the frosting and blend the flavors.
Notes
- Use chocolate, lemon, or red velvet cake for flavor variations.
- Tint frosting with food coloring to match any party theme.
- For cleaner layers, pipe frosting using a piping bag.
- Make ahead and refrigerate up to 4 days before serving.
- Freeze cake and frosting separately for up to 2 months.
- Prep Time: 20 minutes
- Cook Time: 30 minutes
- Category: Dessert
- Method: Baking and Layering
- Cuisine: American
Nutrition
- Serving Size: 1 dessert cup
- Calories: 320
- Sugar: 32g
- Sodium: 240mg
- Fat: 15g
- Saturated Fat: 8g
- Unsaturated Fat: 6g
- Trans Fat: 0g
- Carbohydrates: 44g
- Fiber: 0g
- Protein: 2g
- Cholesterol: 55mg


Leave a Reply