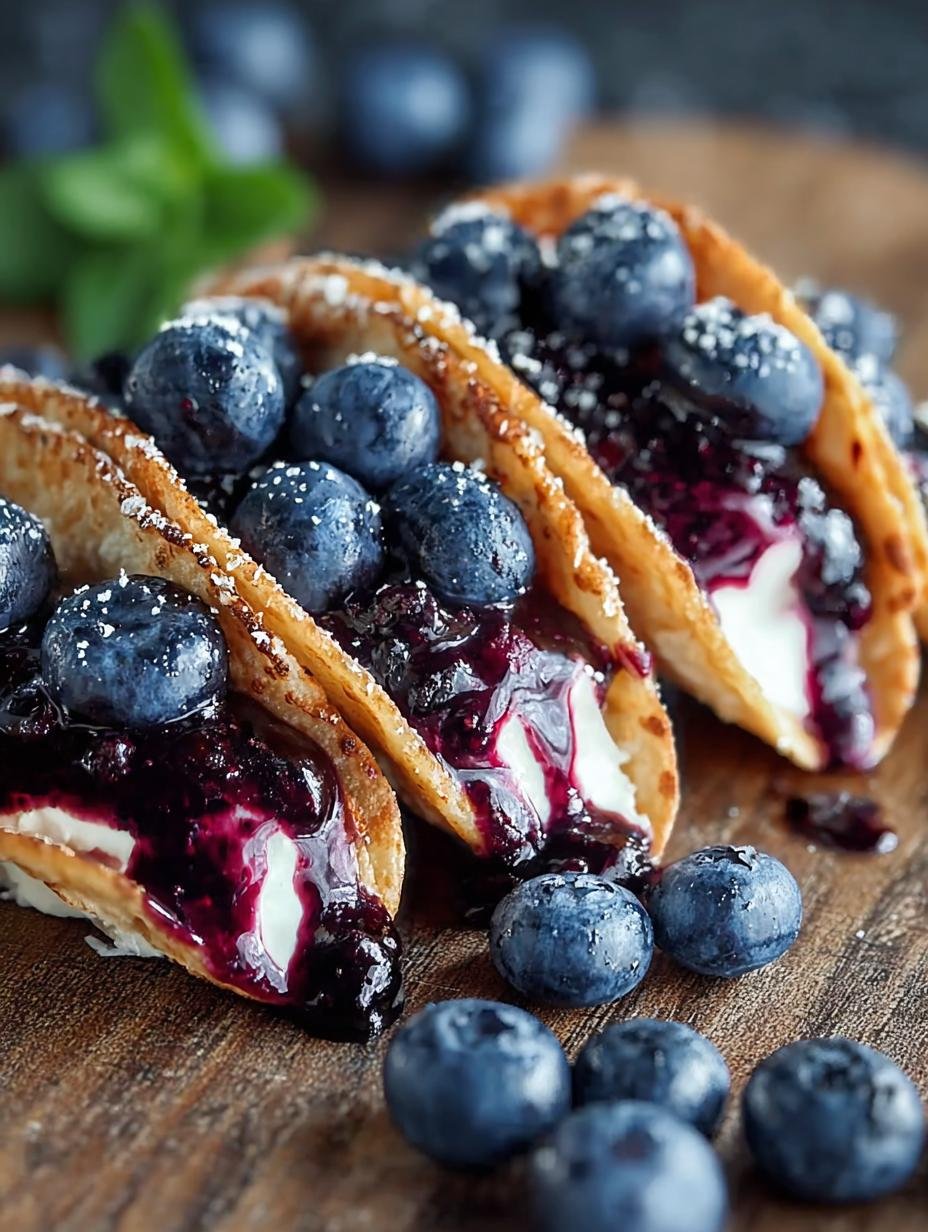
Blueberry Cheesecake Tacos have become my go-to summer treat, and I’m so excited to share this recipe with you! I still remember the first time I tasted one; the combination of a crispy, cinnamon-sugar shell, cool, tangy cheesecake filling, and a burst of warm blueberry sauce was pure magic. It felt like a fancy dessert, but I quickly discovered how surprisingly simple these homemade blueberry cheesecake tacos are to whip up. The aroma of the frying tortillas and the sweet blueberries simmering on the stove is just heavenly. Get ready for a truly delightful experience that’s perfect for any occasion. Let’s get cooking!
Why You’ll Love This Blueberry Cheesecake Tacos
Get ready to fall in love with these delightful treats! Here’s why they’re a winner:
- Incredible Taste: A perfect harmony of sweet, tangy, and creamy with a satisfying crunch.
- Quick Prep Time: You can have these ready in about an hour, making it an ideal dessert for unexpected guests.
- Budget-Friendly Fun: Using simple ingredients makes these a cost-effective way to impress.
- Family Favorite: Kids and adults alike adore this playful twist on dessert. It’s an easy blueberry cheesecake taco that everyone will ask for seconds of.
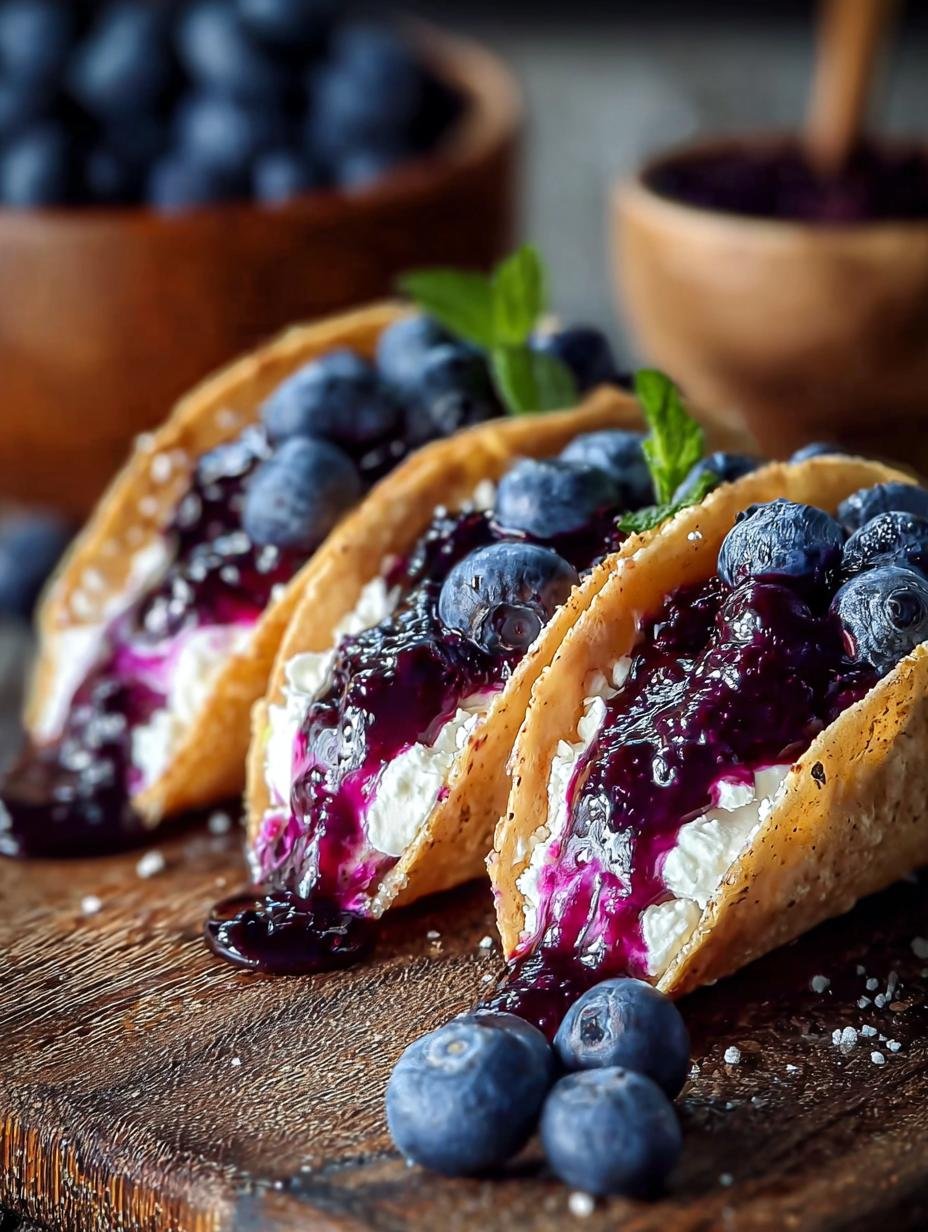
- Visually Stunning: These tacos are as beautiful as they are delicious, perfect for summer parties.
- Customizable: Easily adapt them with different fruits or toppings for endless dessert creations. This is truly an easy blueberry cheesecake taco experience.
- Satisfyingly Sweet: The balance of flavors is just right, offering a delicious way to end any meal.
Ingredients for Blueberry Cheesecake Tacos
Gathering these ingredients is the first step to creating these amazing blueberry cream cheese tacos. The components come together to make a dessert that’s truly special.
- 6 large Flour Tortillas – these will be fried into crispy shells
- 1 tablespoon Light Brown Sugar – for dusting the shells
- 1 cup Vegetable Oil – for frying the tortillas
- 2 cups Fresh Blueberries – the star of our sweet sauce
- 1/2 cup Granulated Sugar – to sweeten the blueberry sauce
- 1/2 cup Water – for the blueberry sauce consistency
- 2 tablespoons Lemon Juice – adds brightness to the sauce and filling
- 1 teaspoon Lemon Zest – for an extra pop of citrus flavor
- 1 tablespoon Cornstarch – to thicken the blueberry sauce
- 1 cup Heavy Whipping Cream – forms the base of our light, airy filling
- 8 oz Cream Cheese, softened – essential for that classic cheesecake flavor
- 1/2 cup Powdered Sugar – for a smooth, sweet cheesecake filling
How to Make Blueberry Cheesecake Tacos
Now for the fun part – bringing these delicious dessert tacos to life! Follow these steps to create a truly memorable treat.
Preparing the Crispy Taco Shells
First, I grab my flour tortillas and cut them into circles about 3.5 to 4 inches wide. Then, I heat about an inch of vegetable oil in a pan over medium heat. I fry each tortilla circle for just about 10 seconds per side until it’s lightly golden and bubbly. Immediately after frying, I carefully fold them into taco shapes and continue frying until they’re nice and crispy. While they’re still warm, I dust them with light brown sugar and place them upside down in a muffin tin to cool and firm up.
Crafting the Sweet Blueberry Sauce
Next, I make the vibrant blueberry sauce. In a medium saucepan, I combine the fresh blueberries with granulated sugar, water, lemon juice, and lemon zest. I let this simmer over medium heat for about 10 minutes, stirring now and then until the blueberries start to burst and soften. To thicken it up, I whisk cornstarch with a tiny bit of water to make a slurry, then stir it into the blueberry mixture until it reaches a lovely saucy consistency. Letting this cool completely is key for the best flavor. For more sauce ideas, check out this homemade tomato sauce recipe, which can inspire different sauce-making techniques.
Creating the Creamy Cheesecake Filling
For the creamy cheesecake filling, I start by whipping the heavy cream in a large bowl until stiff peaks form. This usually takes about 3-5 minutes. In a separate bowl, I beat together the softened cream cheese, powdered sugar, and a splash of lemon juice until it’s perfectly smooth and lump-free. Then, I gently fold the whipped cream into the cream cheese mixture. This step is important for keeping the filling light and airy, making these no-bake blueberry cheesecake tacos feel extra decadent. A smooth filling is crucial, much like in a creamy avocado toast.

Assembling Your Dessert Tacos
Finally, it’s time to assemble these beauties! I use a piping bag to fill each cooled, crispy taco shell with the luscious cheesecake filling. Then, I generously spoon the cooled blueberry sauce over the top, letting it cascade down the sides. For the best texture, I recommend refrigerating these delightful no-bake blueberry cheesecake tacos for about 30 minutes before serving. This allows the filling to set up perfectly, making them the ultimate no-bake blueberry cheesecake tacos.
Pro Tips for the Best Blueberry Cheesecake Tacos
I’ve experimented a lot to get these dessert tacos just right, and I’ve picked up a few tricks along the way. Following these tips will help ensure your homemade blueberry cheesecake tacos are a showstopper every time.
- Don’t Overcrowd the Pan: When frying the tortilla shells, fry them in batches to maintain the oil temperature. This ensures they get crispy, not greasy.
- Cool Components Completely: Make sure both the taco shells and the blueberry sauce are completely cool before assembling. Warm components can make the shells soggy and melt the filling.
- Gentle Folding is Key: For the creamiest cheesecake filling, fold the whipped cream into the cream cheese mixture gently. This preserves the airiness, making them feel light and decadent.
What’s the secret to perfect blueberry cheesecake taco shells?
The trick is a quick fry in hot oil, followed immediately by a dusting of brown sugar while they’re still warm. This caramelizes slightly and adds flavor. For an alternative, you could try making air fryer blueberry cheesecake tacos by cooking shaped tortillas at 375°F (190°C) until crisp. Learning about different grains can also inspire new shell ideas.
Can I make blueberry cheesecake tacos ahead of time?
Yes, you absolutely can! You can prepare the blueberry sauce and the cheesecake filling up to 2 days in advance and store them separately in airtight containers in the refrigerator. The taco shells can be fried and stored at room temperature for up to a day, but assemble them just before serving for maximum crispness.
How do I avoid common mistakes with blueberry cheesecake tacos?
The biggest pitfall is soggy shells, which happens if they aren’t fried long enough or if assembled too early. Also, be careful not to over-whip the cream cheese mixture, as it can become grainy. Always ensure your cream cheese is softened for a smooth filling.
Best Ways to Serve Blueberry Cheesecake Tacos
These sweet treats are fantastic on their own, but I love thinking about creative ways to serve them. They make for wonderful fruity cheesecake taco ideas that impress guests. For a delightful pairing, consider serving them alongside a light, fresh fruit salad to balance the richness. A small scoop of vanilla bean ice cream can also be a wonderful complement, adding another layer of creamy texture. For other dessert inspiration, consider a pistachio pavlova.
You can also present them as part of a dessert platter, alongside other small bites. This allows everyone to sample a few different flavors. They are perfect for summer barbecues, birthday parties, or even just a special weeknight dessert. These dessert tacos blueberry cheesecake are always a hit! If you’re looking for more dessert ideas, explore our dessert category.
Nutrition Facts for Blueberry Cheesecake Tacos
Here’s a breakdown of the estimated nutritional information per serving for these delightful blueberry cheesecake tacos. These values can vary slightly based on the exact ingredients you use.
- Calories: 300 kcal
- Fat: 15 g
- Saturated Fat: 8 g
- Protein: 4 g
- Carbohydrates: 40 g
- Fiber: 2 g
- Sugar: 20 g
- Sodium: 150 mg
Nutritional values are estimates and may vary based on specific ingredients used.
How to Store and Reheat Blueberry Cheesecake Tacos
Proper storage is key to keeping your blueberry cheesecake tacos tasting their best, ensuring they remain delightful creative blueberry cheesecake snacks. After assembling and chilling them, make sure they are completely cooled. Store any leftovers in an airtight container in the refrigerator for up to 3-4 days. I’ve found that placing a piece of parchment paper between layers can help prevent the shells from becoming too soft. For more tips on food preservation, you might find information on sustainable farming practices helpful.
If you want to keep them even longer, freezing is an excellent option. You can freeze the assembled tacos for up to 3 months. Place them on a baking sheet in a single layer until frozen solid, then transfer them to a freezer-safe bag or container. To reheat, it’s best to thaw them overnight in the refrigerator. For a slightly crisper shell, you can briefly warm them in a toaster oven or air fryer at a low temperature (around 300°F or 150°C) for a few minutes. Be gentle, as the filling can be delicate!
Frequently Asked Questions About Blueberry Cheesecake Tacos
What are blueberry cheesecake tacos?
Blueberry cheesecake tacos are a creative and delightful dessert. They consist of crispy, fried tortilla shells, often dusted with cinnamon sugar, filled with a creamy, sweet cheesecake mixture, and then topped with a vibrant, homemade blueberry sauce. They’re a fun, handheld twist on traditional cheesecake, offering a fantastic combination of textures and flavors.
What are the best blueberry cheesecake tacos?
The best blueberry cheesecake tacos are those with perfectly crisp shells that hold their shape, a smooth, rich cheesecake filling, and a bright, flavorful blueberry topping. My recipe aims for this balance, but using fresh, high-quality ingredients and following the steps carefully will lead you to your own version of the best! Don’t be afraid to experiment with the sweetness of the sauce to match your preference.
Can I use store-bought taco shells?
While I love the homemade crunch from frying flour tortillas, you can certainly use store-bought hard taco shells or even pre-made dessert shells if you’re short on time. Just ensure they are sturdy enough to hold the filling. For a fun twist, you could also consider using waffle cones or even edible cookie dough as your “shell” for a different take on these dessert tacos blueberry cheesecake.
Are these considered no-bake blueberry cheesecake tacos?
The filling itself is no-bake, which is wonderful! However, the taco shells are fried, and the blueberry sauce is cooked on the stovetop. So, while a significant portion is no-bake, the overall preparation involves some cooking. This recipe offers a delicious compromise, resulting in fantastic homemade blueberry cheesecake tacos without needing to bake a full cheesecake.
Variations of Blueberry Cheesecake Tacos You Can Try
Once you’ve mastered the classic recipe, you’ll love exploring these fun variations of blueberry cheesecake tacos! They’re a fantastic way to cater to different dietary needs or simply to shake things up.
- Vegan Blueberry Cheesecake Tacos: For a completely plant-based treat, swap the heavy cream and cream cheese for their dairy-free alternatives. There are many excellent vegan cream cheese and whipped coconut cream options available that work beautifully in this filling, making delicious vegan blueberry cheesecake tacos.
- Gluten-Free Blueberry Cheesecake Tacos: To make these gluten-free blueberry cheesecake tacos, simply use corn tortillas instead of flour tortillas for your taco shells. Ensure your corn tortillas are sturdy enough for frying. You can also use gluten-free graham cracker crumbs mixed with a little melted butter as a base if you prefer a crust-like shell.
- Air Fryer Cheesecake Tacos: If you prefer not to deep-fry, try making your taco shells in the air fryer. Shape the tortillas as directed, place them in the air fryer basket, and cook at around 375°F (190°C) until golden and crisp, flipping halfway through. This is a quicker and less messy way to achieve a similar crunch for your dessert tacos.
- Mixed Berry Cheesecake Tacos: Don’t limit yourself to just blueberries! Feel free to mix in other berries like raspberries, strawberries, or blackberries into your sauce for a beautiful mixed berry swirl. This adds another layer of fruity flavor to your cheesecake taco with blueberries.

Blueberry Cheesecake Tacos: 6 Amazing Tips
- Total Time: 1 hour 20 minutes
- Yield: 6 tacos 1x
- Diet: Vegetarian
Description
Enjoy these delightful Blueberry Cheesecake Tacos, a perfect summer dessert. They feature crispy fried tortilla shells filled with creamy cheesecake and topped with a sweet homemade blueberry sauce. Easy to make and visually appealing, they are ideal for gatherings.
Ingredients
- For the Taco Shells:
- 6 large Flour Tortillas
- 1 tablespoon Light Brown Sugar
- 1 cup Vegetable Oil
- For the Blueberry Sauce:
- 2 cups Fresh Blueberries
- 1/2 cup Granulated Sugar
- 1/2 cup Water
- 2 tablespoons Lemon Juice
- 1 teaspoon Lemon Zest
- 1 tablespoon Cornstarch
- For the Cheesecake Filling:
- 1 cup Heavy Whipping Cream
- 8 oz Cream Cheese
- 1/2 cup Powdered Sugar
Instructions
- Prepare Taco Shells: Cut 6 large flour tortillas into 3.5-4 inch circles. Heat 1 inch of vegetable oil in a pan over medium heat. Fry dough circles for about 10 seconds per side until lightly golden. Fold into taco shapes and fry until crispy. Transfer to a bowl coated with light brown sugar immediately after frying. Place upside down in a muffin tin to cool completely.
- Make Blueberry Sauce: In a medium saucepan, combine fresh blueberries, granulated sugar, water, lemon juice, and lemon zest. Cook over medium heat for about 10 minutes, stirring occasionally. Mix cornstarch with a splash of water, add to the blueberry mixture, and stir until thickened. Remove from heat and let cool completely.
- Prepare Cheesecake Filling: In a large bowl, beat heavy whipping cream until stiff peaks form (about 3-5 minutes). In another bowl, beat cream cheese, powdered sugar, and lemon juice until smooth. Gently fold the whipped cream into the cream cheese mixture.
- Assemble Tacos: Use a piping bag to fill the cooled taco shells with the cheesecake filling. Top generously with the cooled blueberry sauce. Refrigerate for about 30 minutes before serving.
Notes
- Garnish with additional fresh blueberries or a dollop of whipped cream if desired.
- For a gluten-free option, use corn tortillas for the shells.
- For a vegan version, use non-dairy cream and vegan cream cheese.
- Prep Time: 30 minutes
- Cook Time: 20 minutes
- Category: Desserts
- Method: Frying and Chilling
- Cuisine: American
Nutrition
- Serving Size: 1 taco
- Calories: 300 kcal
- Sugar: 20 g
- Sodium: 150 mg
- Fat: 15 g
- Saturated Fat: 8 g
- Unsaturated Fat: 7 g
- Trans Fat: 0 g
- Carbohydrates: 40 g
- Fiber: 2 g
- Protein: 4 g
- Cholesterol: 30 mg


Leave a Reply