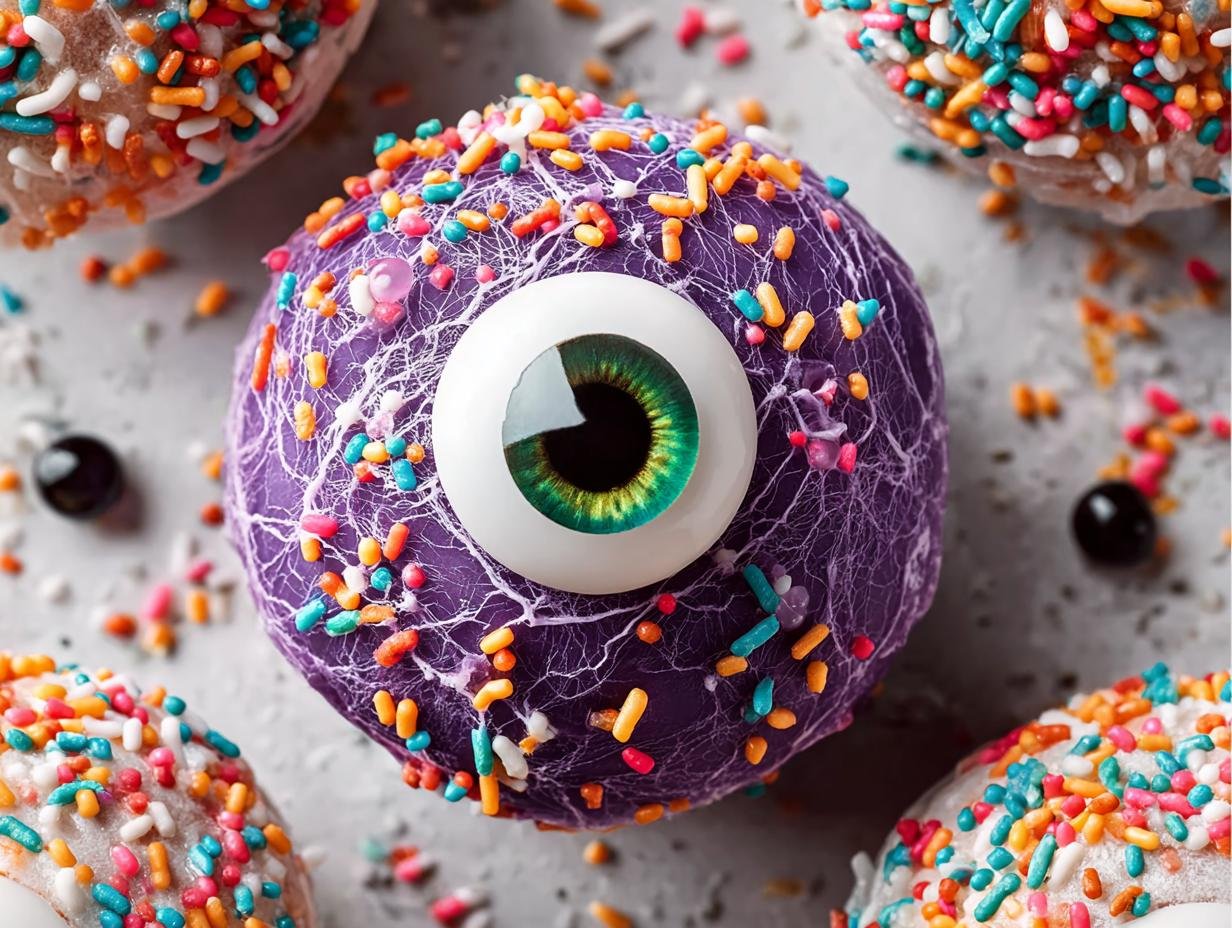
Monster Eyeballs have become my absolute go-to for Halloween, and I can’t wait for you to try them! There’s something so delightfully creepy and fun about these no-bake treats. I still remember the first time I made them with my niece; her squeals of excitement as we pressed the candy eyes into the creamy centers filled our kitchen with so much joy. The sweet scent of Golden Oreos and melting candy fills the air, creating a truly festive atmosphere. These are more than just sweets; they’re memory-makers and perfect Halloween treats eyeballs that everyone, young and old, will adore. Let’s get these spooky little guys made!
Why You’ll Love This Monster Eyeballs Recipe
Get ready for a Halloween treat that’s as fun to make as it is to eat! These Monster Eyeballs are a guaranteed hit for parties and family fun nights. You’ll love them because:
- They’re incredibly easy to assemble, making them perfect easy monster eyeball recipes for busy bakers.
- No baking required means less mess and more time for spooky fun!
- The no-bake nature makes them a fantastic activity for kids of all ages.
- They offer a satisfyingly sweet and creamy texture that everyone raves about.
- These are some of the most creative and memorable spooky dessert ideas you’ll find.
- The customizable candy eyes and sprinkles let you create unique, creepy characters.
- They store beautifully, making them perfect for make-ahead Halloween party food eyeballs.
Ingredients for Monster Eyeballs
Gather these simple ingredients for your no-bake Halloween treats. The base comes from crushed Golden Oreos and softened cream cheese, which create a wonderfully smooth and moldable dough. These form the perfect canvas for our spooky creations! You’ll also need colorful candy melts for coating and, of course, the essential edible monster eyes to bring them to life.
- 19.1 ounces Golden Oreos (or any sandwich cookie) – crushed into fine crumbs for the perfect base
- 8 ounces Cream Cheese, room temperature – essential for a smooth, moldable dough
- 12 ounces Colored Candy Melts – in your favorite spooky Halloween colors
- Color-Matching Sprinkles – for extra flair and texture
- Large Candy Eyes – the star of the show for our edible monster eyes!
How to Make Monster Eyeballs
Ready to dive into creating these fun and creepy treats? Learning how to make monster eyeballs is surprisingly simple, and the process itself is a blast! You’ll be amazed at how quickly these no-bake delights come together, transforming a few basic ingredients into spooktacular Halloween party food eyeballs. Let’s get started on the fun part: decorating monster eyeballs!
- Step 1: Start by crushing your Golden Oreos into fine crumbs. A food processor works best for achieving a super smooth consistency, which is key for the best texture.
- Step 2: Add the softened cream cheese to the crushed cookies. Pulse until everything is thoroughly combined and the mixture forms a smooth, dough-like consistency that’s easy to handle.
- Step 3: Now it’s time to form the eyeballs! Roll the mixture into balls, about 1½ tablespoons each. Place these chilled balls onto parchment-lined baking sheets.
- Step 4: Pop these truffle balls into the refrigerator for about 15 to 30 minutes. This chilling step is crucial to help them firm up, making them easier to coat smoothly.
- Step 5: While the balls chill, melt your colored candy melts. Use a microwave-safe bowl and heat in 45-second intervals, stirring well after each one until the candy is completely smooth and pourable.
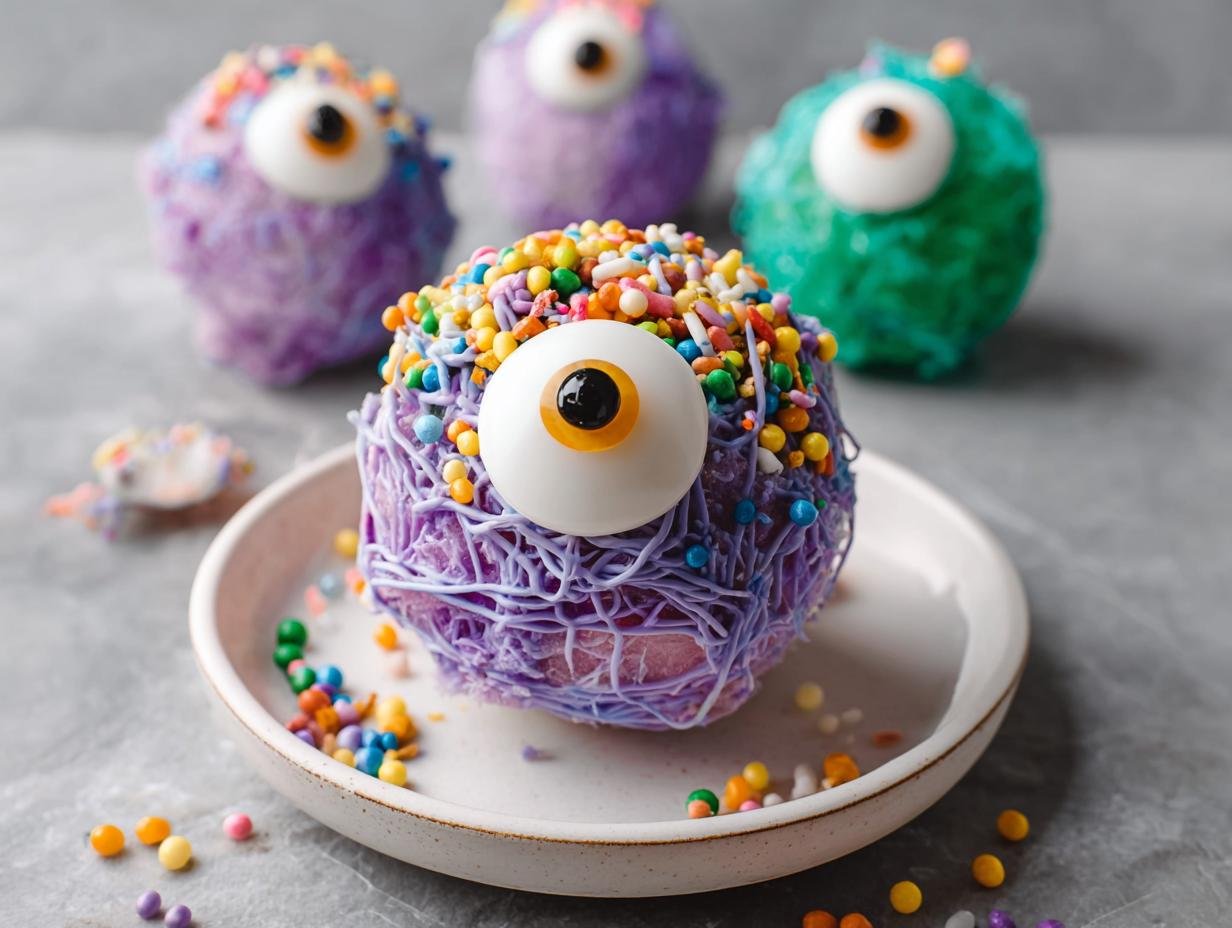
- Step 6: Carefully dip each chilled truffle ball into the melted candy using a fork. Let any excess candy coating drip back into the bowl before placing the coated ball back onto the parchment paper.
- Step 7: Immediately press a large candy eye onto each coated truffle while the candy is still wet. Then, add your color-matching sprinkles for that extra pop of spooky detail.
- Step 8: Once decorated, refrigerate the finished Monster Eyeballs for another 30 minutes. This final chill ensures the candy coating hardens completely.
- Step 9: Serve these delightful Halloween treats eyeballs and watch them disappear! They make for fantastic creepy eyeball snacks that are sure to be a hit.
Pro Tips for the Best Monster Eyeballs
Want to make your Monster Eyeballs truly spectacular? Here are a few tricks I’ve picked up that make all the difference. These little tips will ensure your spooky treats are a huge hit!
- Ensure your cream cheese is truly at room temperature; cold cream cheese makes the mixture lumpy and hard to work with.
- Don’t over-process the Oreos; you want fine crumbs, not a paste, for the best texture in your Monster Eyeballs.
- Chill the truffle balls thoroughly before dipping. This prevents them from melting or falling apart in the warm candy melts.
- Work in batches when dipping and decorating. The candy melts can start to set, so a steady pace is helpful.
What’s the secret to perfect Monster Eyeballs?
The secret to achieving those wonderfully realistic monster eyeballs lies in the chilling steps. Properly chilling the cookie balls before dipping and again after decorating ensures a smooth, even coating and a firm structure that holds its shape beautifully.
Can I make Monster Eyeballs ahead of time?
Absolutely! These are perfect Halloween party food eyeballs to make in advance. Store them in an airtight container in the refrigerator for up to a week. They hold their shape and flavor wonderfully, making party prep a breeze.
How do I avoid common mistakes with Monster Eyeballs?
A common pitfall in any monster ball recipe is a crumbly base. Ensure your cream cheese is fully softened and well-combined with the cookie crumbs. Also, don’t skip the chilling steps; they are crucial for easy handling and a neat finish.
Best Ways to Serve Monster Eyeballs
These creepy delights are perfect for so many occasions! For your next Halloween bash, think beyond just a dessert table. Arrange these spooky eyeball decorations on a platter surrounded by fog or dry ice for an extra dramatic effect. They also make fantastic additions to a spooky charcuterie board, nestled amongst dark chocolates and berry compotes. For a fun kids’ party, serve them alongside “witch’s brew” punch and “spiderweb” cookies for a complete monster-themed spread. You could even place one on top of a cupcake or brownie for an instant festive upgrade!

Nutrition Facts for Monster Eyeballs
When you’re whipping up these fun Halloween treats eyeballs, it’s good to know what you’re serving. Each one of these spooky little delights is a sweet treat packed with flavor.
- Serving Size: 1 eyeball
- Calories: 120 kcal
- Fat: 6 g
- Saturated Fat: 3 g
- Protein: 1 g
- Carbohydrates: 15 g
- Fiber: 0 g
- Sugar: 10 g
- Sodium: 50 mg
- Cholesterol: 10 mg
Nutritional values are estimates and may vary based on specific ingredients used in your monster ball recipe.
How to Store and Reheat Monster Eyeballs
Properly storing your delicious Monster Eyeballs ensures they stay fresh and spooky for your guests. Once they’ve cooled completely after decorating, carefully place them in an airtight container. For the best quality, I recommend keeping them in the refrigerator, where they’ll stay delightful for about 3 to 4 days. If you need to store these creepy eyeball snacks for longer, freezing is a fantastic option! Layer them between sheets of parchment paper in a freezer-safe container to prevent sticking, and they can last for up to 3 months.
When you’re ready to enjoy your frozen treats, the best way to reheat them is simple: just transfer the container to the refrigerator overnight. This allows them to thaw gently. Avoid reheating them in the microwave, as this can make the candy coating soft and messy. Enjoy your perfectly preserved spooky delights!
Frequently Asked Questions About Monster Eyeballs
What are monster eyeballs?
Monster Eyeballs are a fun, no-bake Halloween treat made to look like creepy eyes. Typically, they start with a sweet, moldable base like crushed cookies and cream cheese, which is then coated in colorful candy melts and adorned with candy eyes. They’re a playful and slightly spooky addition to any Halloween party spread, offering a delightful combination of sweetness and visual fun.
Why are monster eyeballs popular?
These treats are incredibly popular because they tap into the fun, playful spookiness of Halloween! They’re visually striking, easy to customize with different colors and sprinkle combinations, and they’re a fantastic activity for kids and adults alike. Plus, they fit perfectly into the broader category of monster inspired desserts. The simple ingredients and no-bake method also make them accessible for bakers of all skill levels, ensuring everyone can create these festive Halloween treats eyeballs.
Can I use different cookies for the base?
Absolutely! While Golden Oreos are fantastic for their sweet, buttery flavor and light color, you can definitely experiment with other sandwich cookies. Chocolate sandwich cookies will give you a darker, richer base for your monster ball recipe, and even other flavored cookies can add a unique twist. Just make sure to crush them finely for the best texture.
How do I get the candy coating smooth?
Melting candy melts properly is key to a smooth coating. Always use a microwave-safe bowl and heat in short intervals, like 45 seconds, stirring well between each. This prevents the candy from burning. If it’s still too thick after melting, you can add a tiny bit of vegetable oil or shortening (about ½ teaspoon at a time) to help thin it out, but be careful not to add too much, or it can become greasy.
Variations of Monster Eyeballs You Can Try
Looking to switch things up or cater to different tastes? These Monster Eyeballs are wonderfully versatile! You can easily adapt the recipe to create unique versions that are just as fun and spooky as the original. Think of them as a base for endless creativity!
- Dietary Adaptations: For gluten-free guests, simply swap the Golden Oreos for your favorite gluten-free sandwich cookies. You can also find dairy-free cream cheese alternatives to make these treats suitable for vegan diets.
- Flavor Infusions: Add a few drops of peppermint extract or a teaspoon of cocoa powder to the cookie and cream cheese mixture for a minty or chocolatey twist. These flavor additions can turn your monster ball recipe into something extra special.
- Cookie Swap: Don’t limit yourself to Oreos! Try using graham crackers, shortbread cookies, or even crumbled gingerbread for a seasonal flair. These variations can lead to delightful monster eye cookies with entirely new flavor profiles.
- Cupcake Toppers: Instead of making full truffle balls, roll smaller portions of the mixture and flatten them slightly. These can be used as adorable, edible toppers for monster eyeball cupcakes, adding a festive touch to your baked goods.

Monster Eyeballs: 1 Creepy No-Bake Treat
- Total Time: 1 hour 15 minutes
- Yield: 24 eyeballs 1x
- Diet: Vegetarian
Description
These no-bake Monster Eyeballs are an adorable and easy Halloween treat. Made with Golden Oreos, cream cheese, and colorful candy melts, they are a fun project for all ages and a guaranteed hit at any spooky celebration.
Ingredients
- 19.1 ounces Golden Oreos (or any sandwich cookie)
- 8 ounces Cream Cheese, room temperature
- 12 ounces Colored Candy Melts
- Color-Matching Sprinkles
- Large Candy Eyes
Instructions
- Crush the Golden Oreos into fine crumbs using a food processor.
- Add the cream cheese to the crushed Oreos and pulse until thoroughly combined and smooth.
- Roll the mixture into 1½ tablespoon-sized balls and place them on parchment-lined baking sheets.
- Chill the truffle balls in the refrigerator for 15-30 minutes until firm.
- Melt the candy melts in a microwave-safe bowl in 45-second intervals, stirring until smooth.
- Dip each chilled truffle into the melted candy using a fork, allowing excess to drip back. Place them back on the parchment paper.
- Press a candy eye onto each coated truffle and sprinkle with color-matching sprinkles.
- Refrigerate the decorated Monster Eyeballs for another 30 minutes until the coating hardens.
- Serve and enjoy your spooky Monster Eyeballs!
Notes
- Store Monster Eyeballs in an airtight container in the refrigerator for up to one week.
- For longer storage, freeze for up to 2-3 months, separating layers with parchment paper.
- Thaw frozen treats in the refrigerator overnight.
- Ensure cream cheese is softened for better blending.
- Use a food processor for even cookie crumbs.
- Dipping with a fork helps control candy melt coverage.
- Do not skip the chilling step to help truffles hold their shape.
- Consider mini candy eyes or DIY chocolate eyes as alternatives.
- Experiment with flavored cream cheese or different sandwich cookies for variations.
- Prep Time: 30 minutes
- Cook Time: 0 minutes
- Category: Desserts
- Method: No-Bake
- Cuisine: American
Nutrition
- Serving Size: 1 eyeball
- Calories: 120 kcal
- Sugar: 10 g
- Sodium: 50 mg
- Fat: 6 g
- Saturated Fat: 3 g
- Carbohydrates: 15 g
- Protein: 1 g
- Cholesterol: 10 mg


Leave a Reply