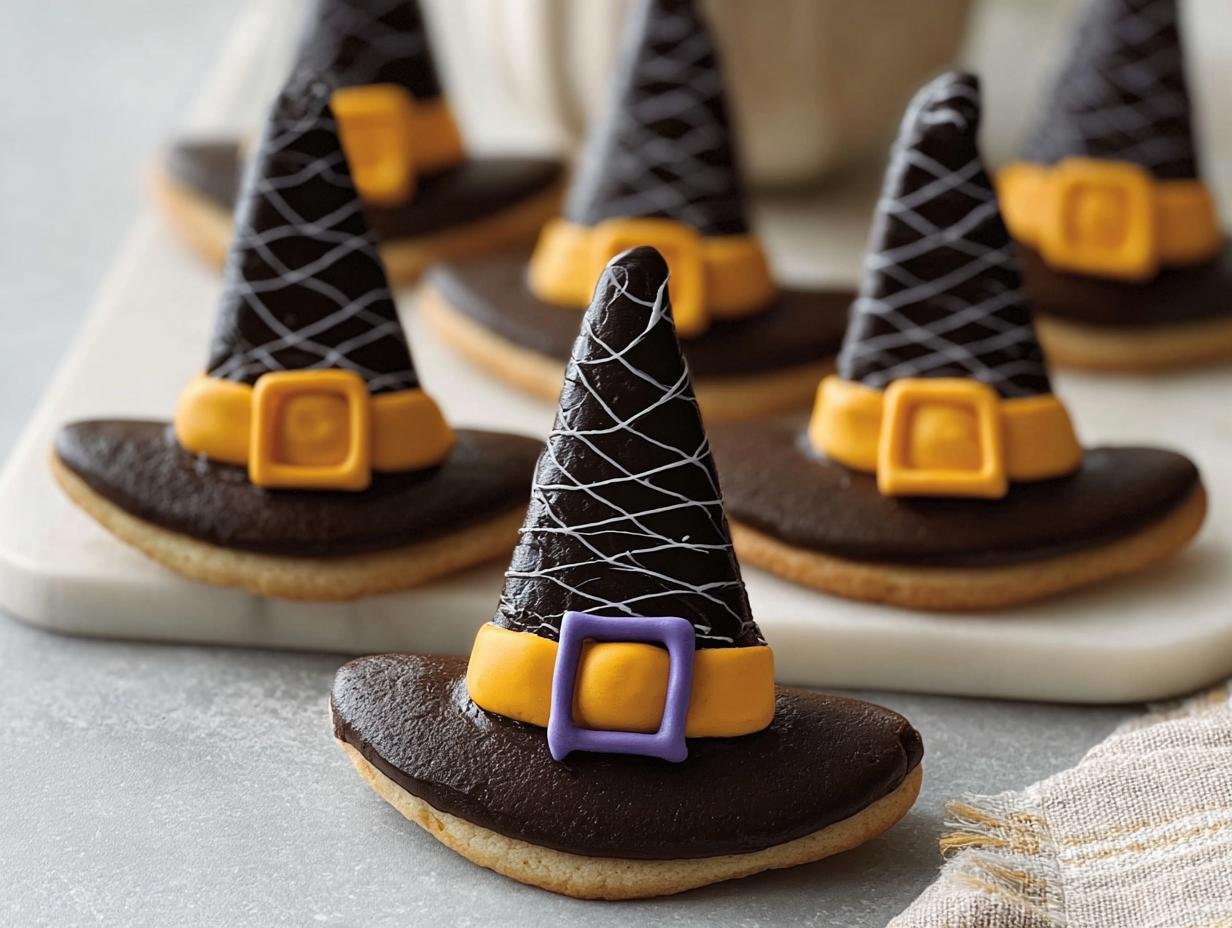
Halloween Witch Hat Cookies have become my absolute favorite spooky treat to make with my little ones. I remember the first time I tried creating these, my kitchen was filled with the sweet aroma of cake mix and a bit of flour dust, but the look on my kids’ faces when they saw the finished, colorful hats was pure magic! These easy witch hat cookies are so simple to assemble, even the youngest bakers can help pipe the icing or add sprinkles. They’re a guaranteed hit for any Halloween party, and honestly, they’re so much fun to decorate, making them perfect kid-friendly witch hat cookies. Let’s get cooking!
Why You’ll Love This Halloween Witch Hat Cookies
- The taste is simply delightful – a sweet cakey cone atop a crisp chocolate cookie.
- You’ll love how quick this witch hat cookie recipe is, with minimal prep time.
- They’re a wonderfully budget-friendly way to get into the Halloween spirit.
- These are incredibly family-friendly, making them a perfect activity for kids.
- The visual appeal is fantastic; they look so charming and festive!
- This witch hat cookie recipe uses simple ingredients you likely already have.
- They are a fun and creative way to decorate for Halloween parties.
- Enjoy a delicious, homemade treat that’s sure to impress your guests.
Ingredients for Halloween Witch Hat Cookies
Gather these simple ingredients to create your spooky treats! We’re using a cake mix and store-bought cookies as our base, which really helps achieve that perfect sugar cookies witch hat shape with minimal fuss. The sugar cones are key to forming the hat’s cone, and the black spray gives them that classic witchy look. Don’t forget the colorful icing for decorating!
- 1 box Favorite Cake Mix – choose your preferred flavor, vanilla or chocolate works great!
- 24 cookies Store Bought Chocolate Cookies – these form the base of our hats
- 12 count Sugar Cones – the structure for our witch hats
- 1 can Black Color Mist Food Coloring Spray – for that essential spooky black color
- 1 cup Creamy White Decorator Icing – the base for all our colorful decorations
- 1 bottle Lemon Yellow Icing Color – to tint some of the white icing
- 1 bottle Rose Icing Color – for pretty pink accents
- 1 bottle Violet Icing Color – for purple details
- 1 bottle Golden Yellow Icing Color – for a nice contrast
- 1 bottle Orange Icing Color – perfect for belts or other fun touches
How to Make Halloween Witch Hat Cookies
Let’s dive into how to make witch hat cookies that are as fun as they are festive! These simple steps will guide you through creating these adorable treats, perfect for any Halloween gathering. The process is surprisingly straightforward, and the results are incredibly rewarding. I love how quickly these come together, making them a fantastic last-minute addition to your spooky spread.
- Step 1: Prepare the Cones. First, preheat your oven to 350°F (175°C) as per your favorite cake mix instructions. Carefully fill each sugar cone with about 2 tablespoons of the prepared cake batter. Place the filled cones onto a baking sheet, ensuring they stand upright. Bake for 15-18 minutes, or until the cake is cooked through and a toothpick inserted comes out clean. Let them cool completely on the baking sheet.
- Step 2: Color the Cones. Once the cake-filled cones are completely cool, it’s time for their spooky transformation. Gently trim any excess cake from the top of the cones to create a flat surface for decorating. Now, take your black color mist food coloring spray and give each cone an even coating. Let these dry completely; this is crucial to prevent smudging later.
- Step 3: Tint the Icing. While the cones are drying, prepare your decorator icing. Divide the 1 cup of creamy white decorator icing into several small bowls. Add a drop or two of your chosen icing colors – lemon yellow, rose, violet, golden yellow, and orange – to each bowl, stirring until you achieve vibrant hues. Spoon the tinted icings into piping bags fitted with small tips.
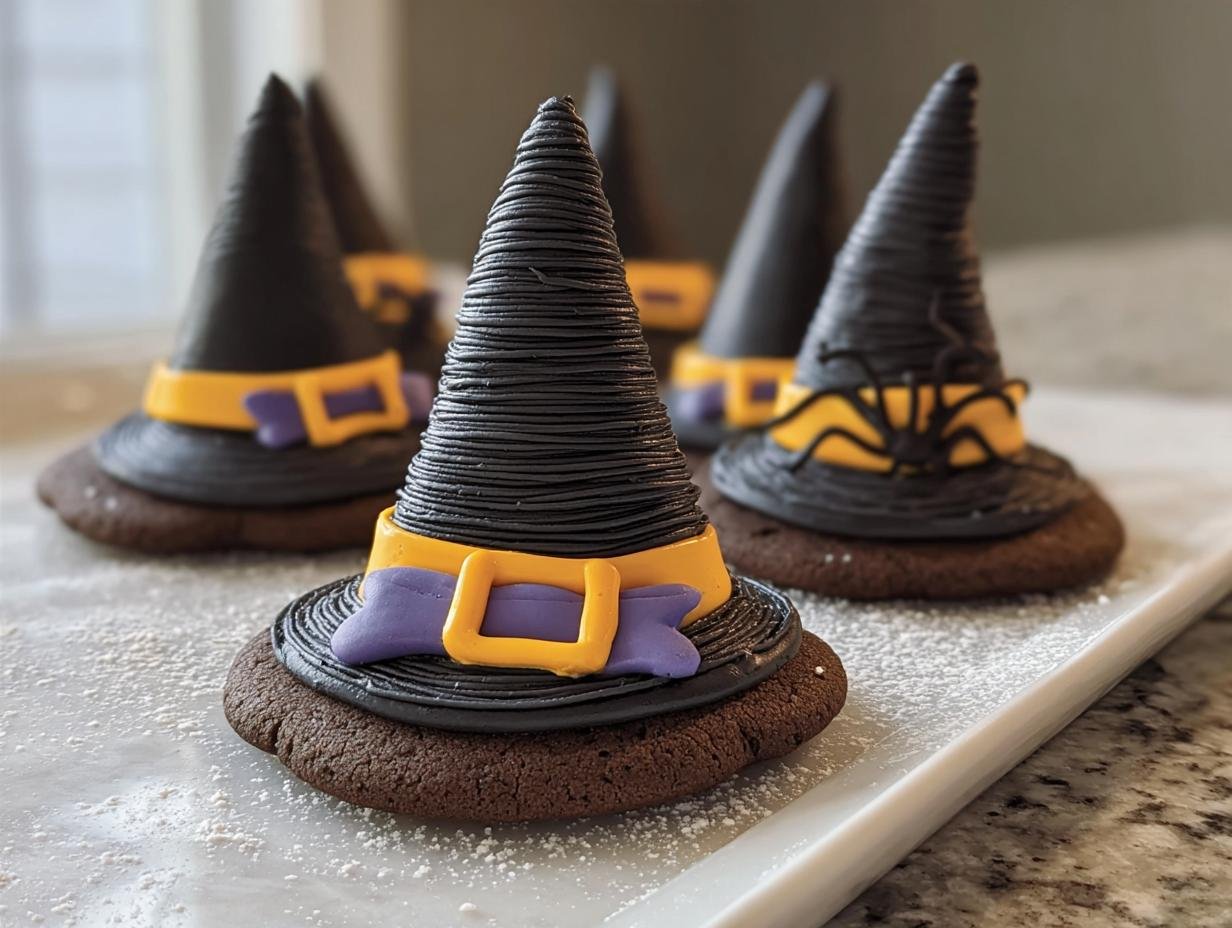
- Step 4: Assemble the Hats. Now for the fun part of how to make witch hat cookies! Pipe a small amount of orange icing onto the top of each store-bought chocolate cookie; this acts as edible glue. Carefully position one of your dried black cones onto the icing on each cookie. For extra stability and a nice finish, pipe a ring of orange or purple icing around the base where the cone meets the cookie.
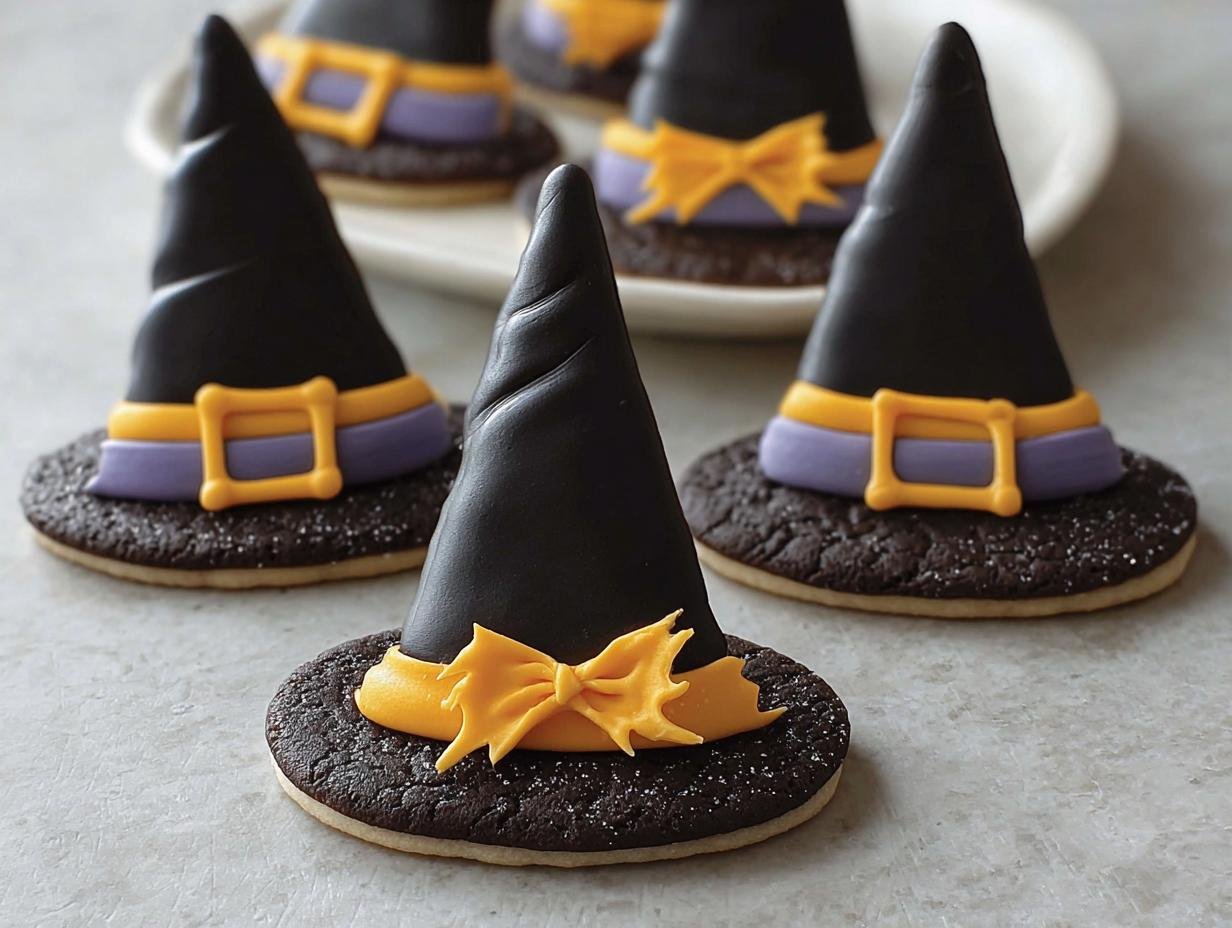
- Step 5: Finish with Details. Let the initial icing holding the cone and cookie together set for a few minutes. This prevents the cone from sliding. Now, pipe a yellow buckle around the band of each cone to mimic a classic witch hat detail. Allow the buckle icing to dry completely before serving your amazing Halloween Witch Hat Cookies.
Pro Tips for the Best Halloween Witch Hat Cookies
Want to make your Halloween Witch Hat Cookies truly spectacular? I’ve picked up a few tricks over the years that really elevate these simple treats. These tips will help ensure your cookies are not only adorable but also delicious and perfectly assembled.
- For a smoother cake batter inside the cones, ensure your cake mix is fresh and you measure the wet ingredients accurately.
- When spraying the cones black, do it in a well-ventilated area, perhaps outside, and use light, even coats.
- Letting the black spray dry completely is key; I learned this the hard way when I had black smudges everywhere!
- Pipe icing onto a flat surface before attaching the cone; it’s easier to get a straight line that way.
What’s the secret to perfect Halloween Witch Hat Cookies?
The real secret to perfect Halloween Witch Hat Cookies lies in the preparation of the cones. Baking the cake mix inside the sugar cones creates a delightful texture contrast. My favorite witch hat cookie recipe tip is to let the cones cool completely before spraying them black, ensuring a clean, crisp finish. For more baking tips, check out our recipe section.
Can I make Halloween Witch Hat Cookies ahead of time?
Absolutely! You can bake and cool the cake-filled cones up to 24 hours in advance. Store the completely dried black cones in an airtight container at room temperature. Decorate the cookies on the day you plan to serve them for the most vibrant and fresh-looking results.
How do I avoid common mistakes with Halloween Witch Hat Cookies?
A common pitfall is not letting the black spray dry fully, leading to smudges. Another is overfilling the sugar cones, which can cause overflow. Finally, don’t rush the assembly; allowing the initial icing to set slightly before adding details helps everything hold its shape. For more tips on avoiding baking mishaps, consider reading about testing the elements in baking.
Best Ways to Serve Halloween Witch Hat Cookies
These festive treats are perfect for any Halloween gathering! For a truly impressive spread, arrange your Halloween Witch Hat Cookies on a tiered platter alongside other spooky desserts like ghost cupcakes or pumpkin brownies. They also make a wonderful addition to a Halloween cookie decorating party, where guests can customize their own decorated witch hat cookies with various colored icings and sprinkles. Pair them with a warm mug of apple cider or hot chocolate for a cozy, autumnal feel. These cookies are sure to delight both kids and adults alike!
Nutrition Facts for Halloween Witch Hat Cookies
Here’s a look at the estimated nutritional information for each of these delightful Halloween Witch Hat Cookies, so you know what you’re serving up:
- Calories: 150 kcal
- Fat: 7 g
- Saturated Fat: 3 g
- Protein: 1 g
- Carbohydrates: 20 g
- Fiber: (Not specified)
- Sugar: 12 g
- Sodium: 70 mg
Nutritional values are estimates and may vary based on specific ingredients used. For more information on nutritional aspects of food, you might find resources on nutritional powerhouses helpful.
How to Store and Reheat Your Delicious Halloween Witch Hat Cookies
Once your spooky creations are fully assembled and the icing details have dried, you’ll want to store them properly to keep them looking and tasting their best. For optimal freshness, ensure the cookies are completely cool before storing. Place your finished homemade witch hat cookies in an airtight container. You can refrigerate them for up to 3-4 days; just make sure to let them come to room temperature before serving for the best texture. If you need to store them for longer, these cookies freeze beautifully for up to 3 months!
To freeze, wrap each cookie individually in plastic wrap, then place them in a freezer-safe bag or container. When you’re ready to enjoy them again, simply move the cookies from the freezer to the refrigerator overnight to thaw. There’s no need to reheat them, as they are best enjoyed at room temperature. This makes them a fantastic make-ahead treat for any Halloween party!
Frequently Asked Questions About Halloween Witch Hat Cookies
What are Halloween Witch Hat Cookies?
Halloween Witch Hat Cookies are a fun and festive dessert that looks like a witch’s hat. They are typically made by attaching a cone-shaped cake baked inside a sugar cone to a round cookie base, all decorated with colorful icing to resemble a witch’s hat. They are a popular choice for Halloween parties and cookie decorating activities.
Can I use a different type of cookie for the base of my Halloween Witch Hat Cookies?
Yes, you absolutely can! While chocolate cookies provide a nice contrast and a sturdy base, feel free to experiment. Round sugar cookies, shortbread cookies, or even vanilla wafers would work well. Just ensure they are flat and sturdy enough to hold the cone steady. This flexibility makes our witch hat cookie recipe even more adaptable!
How do I make the icing stick better to the black cones?
For best results when attaching the cone to the cookie, ensure both surfaces are completely dry and free of any oils or dust. A small dab of slightly thicker icing, like the orange or purple icing used for the base, works well as an adhesive. Allow this initial bit of icing to set for a few minutes before attaching the cone to prevent slippage.
Are there any no-bake options for Halloween Witch Hat Cookies?
While this recipe involves baking the cones, you can adapt the concept for a no-bake version. Instead of baking cake mix, you could use pre-made chocolate cupcakes or large round cookies as the base. For the hat cone, you could use ice cream cones (like sugar cones or waffle cones) that are already baked and simply dip them in melted chocolate or frosting and then decorate. This makes for incredibly easy witch hat cookies with minimal effort. For other easy dessert ideas, check out our easy cinnamon rolls.
Variations of Halloween Witch Hat Cookies You Can Try
Once you’ve mastered the basic Halloween Witch Hat Cookies, there are so many fun ways to switch things up! Getting creative with these treats is half the fun. Here are a few ideas to inspire your next batch of decorated witch hat cookies.
- Dietary Variations: For gluten-free friends, use a gluten-free cake mix and gluten-free chocolate cookies as your base. You can also find gluten-free sugar cones! For a dairy-free option, use a dairy-free cake mix alternative and dairy-free cookies.
- Flavor Twists: Experiment with different cake mix flavors like red velvet or funfetti for colorful surprises inside the cones. You could also try chocolate-dipped cookies as the base for an extra layer of richness.
- No-Bake Approach: If you’re short on time, skip baking the cones! Use pre-made ice cream cones (sugar or waffle) and dip them in melted chocolate or vibrant colored candy melts. Once set, attach them to your cookies with a bit of frosting. These are super easy witch hat cookies!
- Spooky Color Palettes: Don’t limit yourself to just black and yellow! Try purple cones with green buckles, or even a white base with a black cone for a different spooky look. The possibilities for Halloween cookie decorating witch hats are endless!

Halloween Witch Hat Cookies: 5 Magic Tips
- Total Time: 48 minutes
- Yield: 12 cookies 1x
- Diet: Vegetarian
Description
Create fun and festive Halloween Witch Hat Cookies using cake mix and sugar cones. These easy-to-make cookies are perfect for kids and parties, offering endless customization with colorful icing.
Ingredients
- 1 box Favorite Cake Mix
- 24 cookies Store Bought Chocolate Cookies
- 12 count Sugar Cones
- 1 can Black Color Mist Food Coloring Spray
- 1 cup Creamy White Decorator Icing
- 1 bottle Lemon Yellow Icing Color
- 1 bottle Rose Icing Color
- 1 bottle Violet Icing Color
- 1 bottle Golden Yellow Icing Color
- 1 bottle Orange Icing Color
Instructions
- Prepare the cones: Bake cake mix according to package instructions. Fill each sugar cone with about 2 tablespoons of batter and place on a baking sheet. Bake at 350°F for 15-18 minutes until cooked through. Allow to cool completely.
- Color the cones: Once cooled, trim excess cake from the top of the cones. Spray the cones with black color mist food coloring for even coverage, then let them dry completely.
- Tint the icing: Divide white decorator icing into bowls. Color one bowl lemon yellow and another with rose or violet icing color. Prepare piping bags.
- Assemble the hats: Pipe a small amount of orange icing onto the tops of each cookie for adhesive. Position a sugar cone on each cookie. Pipe orange or purple icing around the base of the cone to secure it.
- Finish with details: Allow the initial icing to set for a few minutes. Pipe a yellow buckle around the band of each cone and let it dry completely before serving.
Notes
- Bake and cool cones up to 24 hours ahead. Store dried cones in an airtight container.
- Decorate the cookies with icing on the same day for vibrant results.
- Allow black spray to dry completely before assembly to prevent smudging.
- Use a sharp knife for clean cuts when trimming cones.
- Ice cookies promptly after spraying for better icing adhesion.
- Store finished cookies in an airtight container at room temperature for up to 5 days.
- Prep Time: 20 minutes
- Cook Time: 18 minutes
- Category: Desserts
- Method: Baking
- Cuisine: American
Nutrition
- Serving Size: 1 cookie
- Calories: 150 kcal
- Sugar: 12 g
- Sodium: 70 mg
- Fat: 7 g
- Saturated Fat: 3 g
- Carbohydrates: 20 g
- Protein: 1 g
- Cholesterol: 10 mg


Leave a Reply