
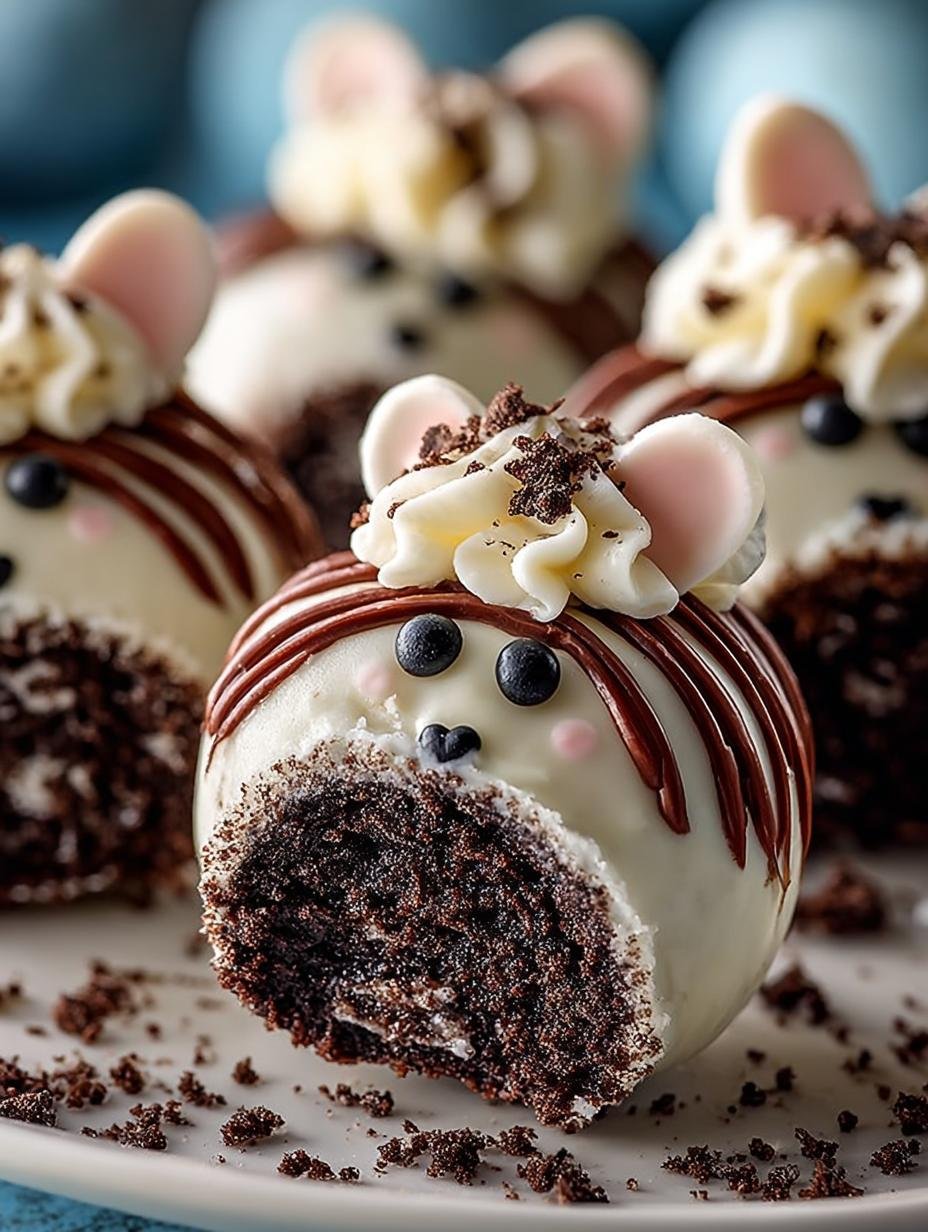
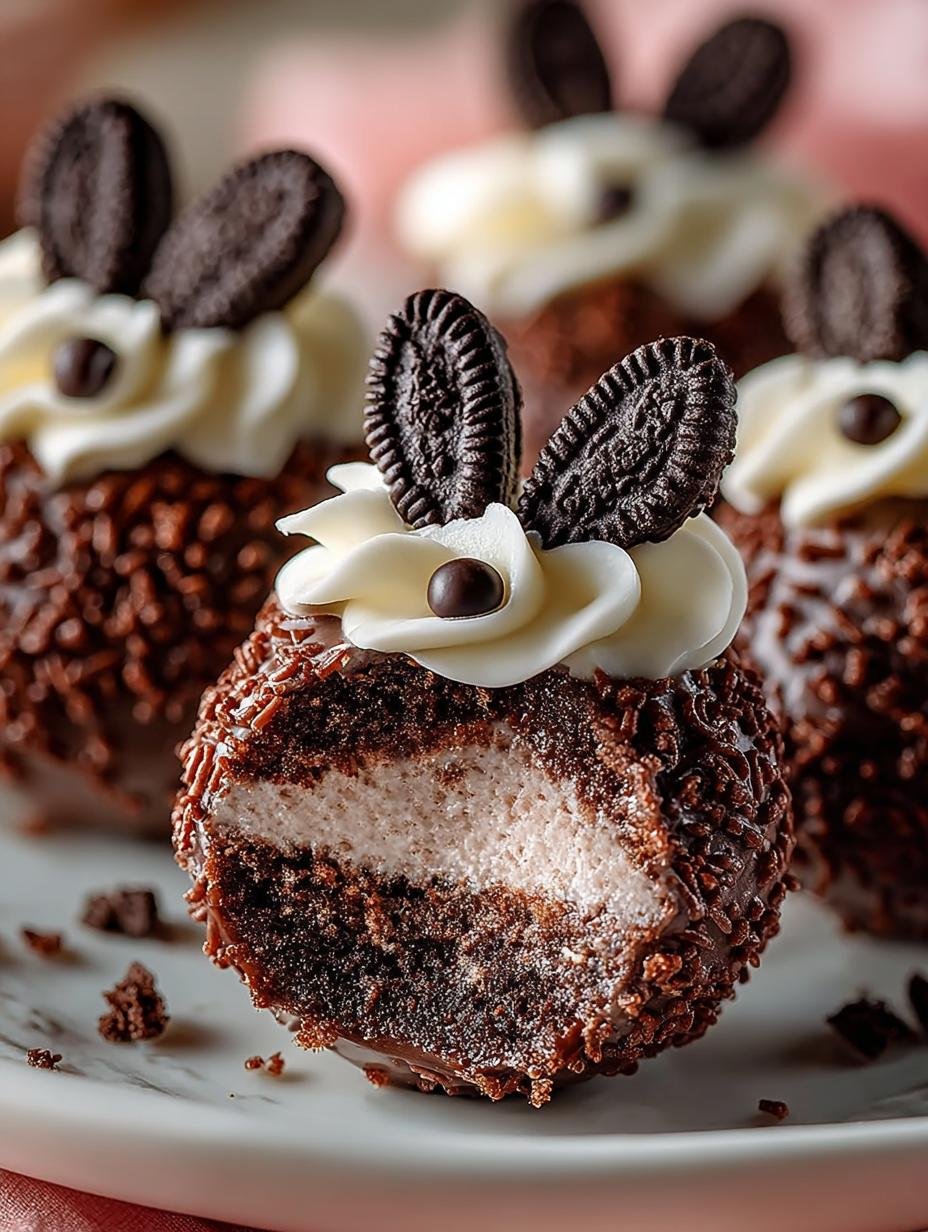
Bunny Butt Oreo Balls are the cutest and most delightful no-bake treats you can whip up for Easter celebrations or any festive gathering. These adorable dessert balls feature a creamy Oreo filling coated in sweet white chocolate, topped with playful bunny decorations. The whimsical design and delicious flavor make them irresistible for both kids and adults alike. Whether you’re hosting a party or simply want to bring a smile to someone’s face, these Bunny Butt Oreo Balls are sure to brighten the occasion!
Why You’ll Love This Bunny Butt Oreo Balls
These Bunny Butt Oreo Balls are not just a treat; they are a celebration of creativity and flavor! Here are some reasons to love them:
- Adorable presentation that delights both kids and adults.
- No-bake recipe makes them easy and quick to prepare.
- Perfect for Easter gatherings and bunny-themed parties.
- Customizable with different decorations to match any theme.
- Fun way to get kids involved in the kitchen.
- Great as a sweet gift for family and friends.
Plus, they’re a fantastic option for those looking for no-bake bunny treats that are vegetarian-friendly!
Ingredients for Bunny Butt Oreo Balls
Gather these items:
- 1 package (15.25 oz) Oreo cookies
- 8 oz cream cheese, softened
- 2 cups white chocolate chips or white chocolate melts
- 1 tbsp vegetable oil (optional, for thinning chocolate)
- Mini marshmallows (for bunny tails)
- Pink or white candy melts (for bunny feet)
- 1 tsp pink sugar or sprinkles
- 1/2 cup coconut flakes (optional)
- 1–2 tsp vanilla extract (optional)
How to Make Bunny Butt Oreo Balls Step-by-Step
- Step 1: Crush the Oreo cookies into fine crumbs using a food processor or rolling pin.
- Step 2: In a bowl, mix Oreo crumbs with softened cream cheese and vanilla extract until smooth.
- Step 3: Refrigerate the mixture for about 30 minutes to firm up.
- Step 4: Scoop and roll the mixture into balls and place on a parchment-lined baking sheet.
- Step 5: Gently flatten the top of each ball to create space for the bunny tail.
- Step 6: Melt the white chocolate in 30-second microwave intervals, stirring until smooth. Add vegetable oil if needed.
- Step 7: Dip each Oreo ball into the melted chocolate and place back on parchment.
- Step 8: While the coating is soft, press a mini marshmallow into the center for the bunny tail.
- Step 9: Melt candy melts and pipe or draw bunny feet onto each ball.
- Step 10: Sprinkle coconut flakes, pink sugar, or sprinkles before the coating sets if desired.
- Step 11: Refrigerate for 1–2 hours until fully set.
Pro Tips for the Perfect Bunny Butt Oreo Balls
Keep these in mind:
- Make sure your cream cheese is softened for easier mixing.
- Use high-quality chocolate for the best flavor.
- Try adding other fun toppings like edible glitter or colored sprinkles for extra flair.
- These Bunny Butt Oreo Balls are kid-friendly bunny treats that can be customized for any occasion.
Best Ways to Serve Bunny Butt Oreo Balls
These adorable treats are perfect for various occasions:
- Serve them on a festive dessert table alongside other cute bunny Oreo balls and treats.
- Use them as party favors in cute little bags for guests.
- Pair them with a cup of hot chocolate or a refreshing spring drink for a delightful treat.
How to Store and Reheat Bunny Butt Oreo Balls
To keep your Bunny Butt Oreo Balls fresh, store them in an airtight container in the refrigerator for up to a week. They can also be frozen for longer storage. Just remember to let them thaw in the fridge before serving. This makes them a great option for meal prep!
Frequently Asked Questions About Bunny Butt Oreo Balls
What’s the secret to perfect Bunny Butt Oreo Balls?
The key to perfect Bunny Butt Oreo Balls is ensuring the mixture is well-combined and the chocolate coating is smooth. Use quality chocolate for dipping and let them chill adequately before serving.
Can I make Bunny Butt Oreo Balls ahead of time?
Absolutely! These Bunny Butt Oreo Balls can be made a day or two ahead of time. Just store them in an airtight container in the fridge until you’re ready to serve.
How do I avoid common mistakes with Bunny Butt Oreo Balls?
To avoid common pitfalls, make sure to properly crush the Oreo cookies and mix the cream cheese thoroughly. If the mixture is too soft, refrigerate it longer before rolling into balls.
Variations of Bunny Butt Oreo Balls You Can Try
Feel free to experiment with these fun variations:
- Use chocolate Oreo cookies for a chocolatey twist.
- Add different flavors of candy melts for unique colors and tastes.
- Incorporate crushed nuts or other candies into the filling for added texture.
These variations make them perfect for any celebration and enhance the fun of this Bunny Butt Oreo Dessert Recipe!
For more delicious dessert ideas, check out our dessert recipes and other recipes!
For tips on making the best chocolate treats, you can refer to this guide on melting chocolate.
Additionally, if you’re interested in more fun baking ideas, check out our easy cinnamon rolls recipe!
Print
Delicious Bunny Butt Oreo Balls for Easter Fun
- Total Time: 2 hours 20 minutes
- Yield: 24 balls 1x
- Diet: Vegetarian
Description
Adorable no-bake Bunny Butt Oreo Balls with a creamy Oreo filling, sweet white chocolate coating, and playful bunny decorations. A fun, festive dessert that’s perfect for holidays, parties, or anytime you want a whimsical treat.
Ingredients
- 1 package (15.25 oz) Oreo cookies
- 8 oz cream cheese, softened
- 2 cups white chocolate chips or white chocolate melts
- 1 tbsp vegetable oil (optional, for thinning chocolate)
- Mini marshmallows (for bunny tails)
- Pink or white candy melts (for bunny feet)
- 1 tsp pink sugar or sprinkles
- 1/2 cup coconut flakes (optional)
- 1–2 tsp vanilla extract (optional)
Instructions
- Crush the Oreo cookies into fine crumbs using a food processor or rolling pin.
- In a bowl, mix Oreo crumbs with softened cream cheese and vanilla extract until smooth.
- Refrigerate the mixture for about 30 minutes to firm up.
- Scoop and roll the mixture into balls and place on a parchment-lined baking sheet.
- Gently flatten the top of each ball to create space for the bunny tail.
- Melt the white chocolate in 30-second microwave intervals, stirring until smooth. Add vegetable oil if needed.
- Dip each Oreo ball into the melted chocolate and place back on parchment.
- While the coating is soft, press a mini marshmallow into the center for the bunny tail.
- Melt candy melts and pipe or draw bunny feet onto each ball.
- Sprinkle coconut flakes, pink sugar, or sprinkles before the coating sets if desired.
- Refrigerate for 1–2 hours until fully set.
Notes
- Prep Time: 30 minutes
- Cook Time: 0 minutes
- Category: Dessert
- Method: No-bake
- Cuisine: American
Nutrition
- Serving Size: 1 ball
- Calories: 150
- Sugar: 10g
- Sodium: 50mg
- Fat: 9g
- Saturated Fat: 5g
- Unsaturated Fat: 4g
- Trans Fat: 0g
- Carbohydrates: 16g
- Fiber: 1g
- Protein: 2g
- Cholesterol: 20mg


Leave a Reply